To the uninitiated, we are not talking about Docker clothing company, which makes the popular Men’s Khakis. What we are talking about is the Docker that has changed the way Software Applications are built, shipped and run. You have probably heard about Docker and how cool it is, but never really understood fully. And you are itching to finally sit down and read about it. You have come to the right place. In this blog post, I’m going to demystify Docker for you. By reading this guide fully, you will understand,
- What the heck is Docker?
- What makes Docker so invaluable and indispensable?
- How to install Docker on your PC or MAC?
- How to build images and run containers
- How to create and use Data volumes with Docker
- How to configure basic Networking
Ready? Let’s begin.

What the heck is Docker?
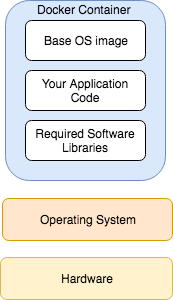
Docker is a platform for Applications to be built and run in a container with all the required software packaged in it.
But you ask, what in the world is container?
Container is a Docker process that can be run on any Linux or Windows based system. It includes everything it needs to run, including System libraries, application code, application dependencies and configuration files. (You throw Docker container at a Car’s bumper and it will still work. Just kidding.). A Docker container is a mini-machine in its own right. Containers running on a system share the Operating System Kernel with other processes (including other Docker containers).
Tip: You can list all the Docker containers running your system by running the command
docker ps
Let’s take a look at the diagram below, which shows how various components fit it.
To contrast this with how software applications are traditionally run, look at the image below.
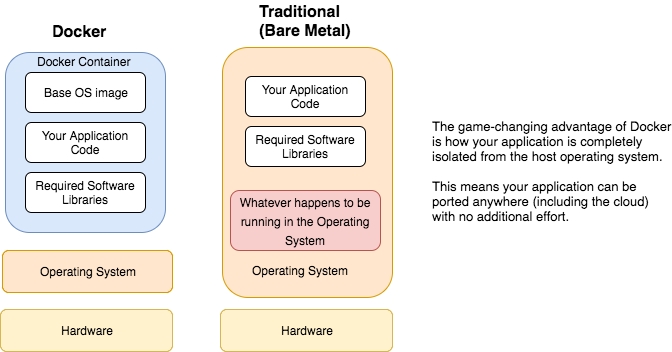
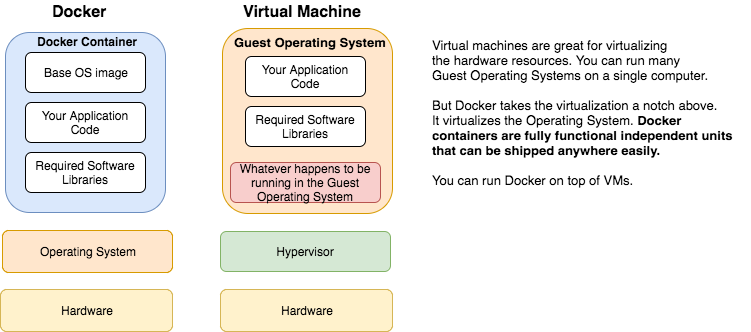
At this point, you may be wondering, ‘Wait a minute. I’ve seen this before. Are you not talking about virtualization? Vmware and stuff?‘
Not really. Simply put, vmware visualizes the underlying hardware resources. But Docker visualizes the Operating System.
At this point, if you have been doing Application Support for a while, one striking advantage should be obvious to you: consistency of environments. Think about how many times you have been told by the development team: ‘Oh, but it works in my local Dev environment. Something must be wrong in production servers. May be a jar file is missing in the classpath in Prod?, Or may be the Java minor version is different in prod?’ Painful. Docker puts an end to all this environment specific mysteries.
So, to summarize: Docker is a container solution that enables building, shipping and running applications with all the required software in a single unit. The benefits include consistency across deployments, fast startup, flexible and developer-friendly build process.
Enough fluff. Let’s get our hands moving by actually running a Docker container.
Installing Docker
Before you can actually run your first Docker container, you have to install Docker software. If you already have docker installed in your PC, MAC or a Linux/Windows Server you have access to, feel free to skip this section.
What do you need to begin?
A Linux or Windows or MAC system (can be a desktop or a server).
There are two flavors of Docker. Community Edition and Enterprise Edition. Community Edition is free and mainly geared towards learning and testing purposes. Enterprise Edition comes with few bells and whistles and also comes with an invoice in the mail. We will be using Community edition to learn Docker. (Note: You cannot install Docker Enterprise Edition in Desktops). For full compatibility matrix, check this link.
Note: In older MAC and Windows systems, Docker was installed using Docker Toolbox, a legacy desktop solution that included docker-machine, docker and docker-compose commands. If you have newer MAC ( OS X El Capitan10.11 or later) or Windows (Windows 10 or later) It is recommended to install Docker for MAC or Docker for Windows respectively, instead of installing Docker Toolbox
MAC
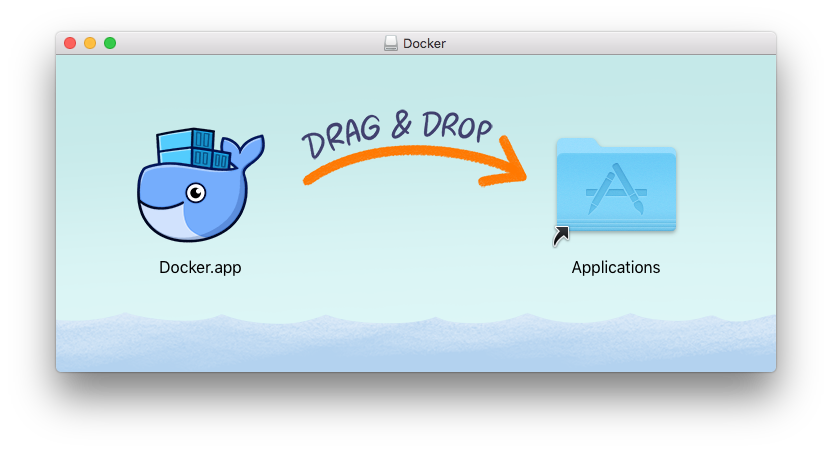
To install Docker for MAC, download the dmg from Get Docker for Mac (Stable).
Double click Docker.dmg. Drag and drop to the Applications folder as shown below.
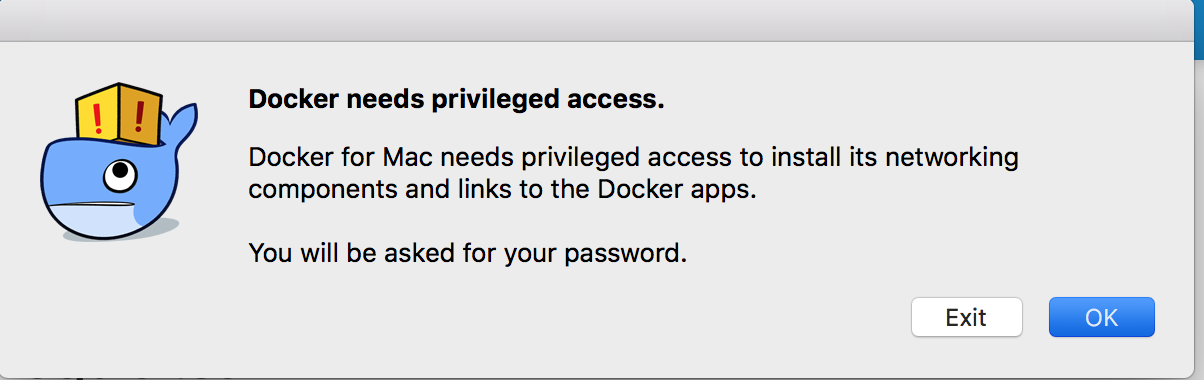
Note: You must have Admin privilege to perform the install, as shown by the pop up below that appears when you run the install
Once installed, the docker icon (Blue Whale) should appear on your top status bar.
Windows
Download the installer from Get Docker for Windows (Stable).
Simply launch the exe file and follow prompts. It should be a super straight forward install.
Ubuntu
You can use apt-get to install from the Docker repository or install a deb package using dpkg.
Follow the instructions here
CentOS
You can use yum to install from the Docker repository or download rpm from here
For detailed instructions, go here.
Great, now that you’ve installed Docker, let’s start playing with it with some basic commands.
Using Docker for the first time
We will be using Docker for Mac to illustrate. The commands are exactly the same in other flavors.
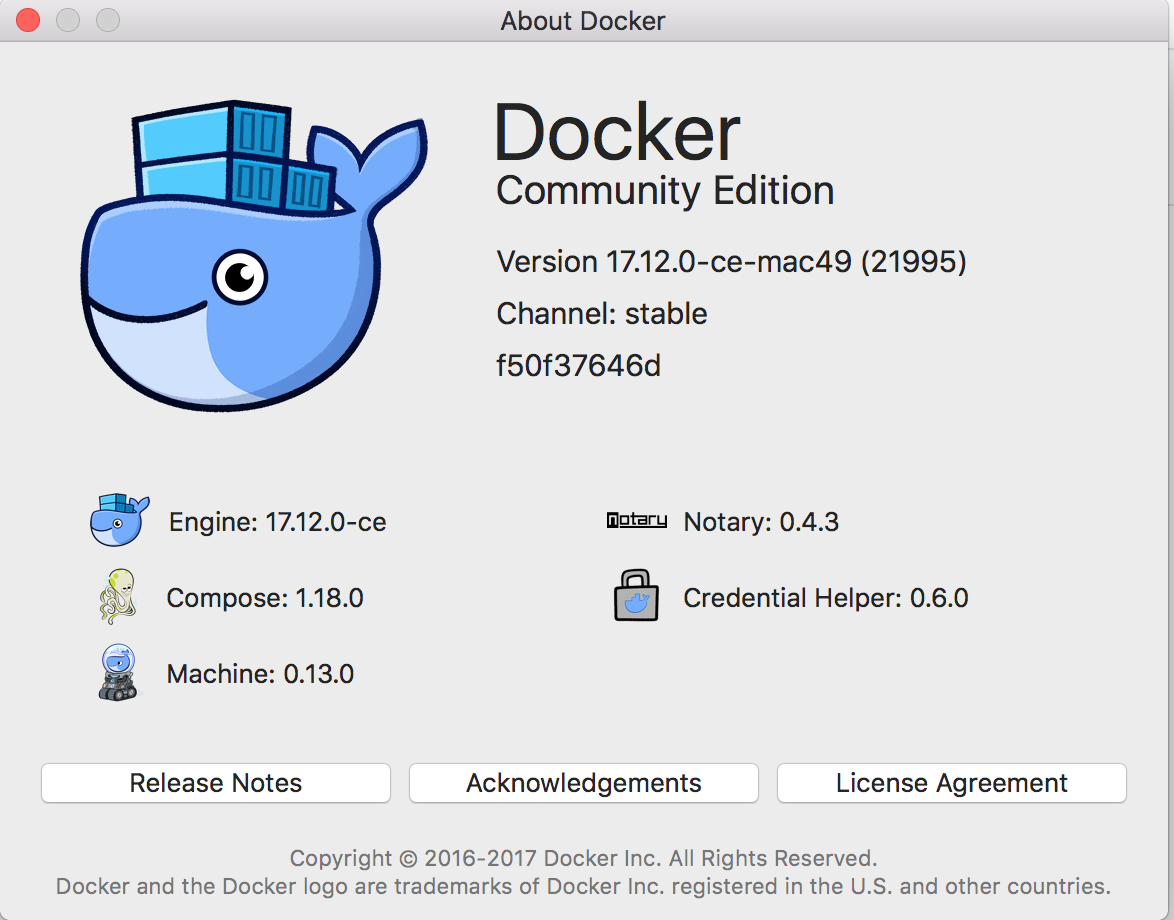
First thing you want to do is to make sure you have the latest version of Docker (at least not some ancient version). As of this writing, Docker CE 17.12.0 is the stable version. Click on the Docker icon (Whale) at the top status bar and click on About Docker
Open a terminal and type the following command
~$docker version
Client:
 Version: 17.12.0-ce
 API version: 1.35
 Go version: go1.9.2
 Git commit: c97c6d6
 Built: Wed Dec 27 20:03:51 2017
 OS/Arch: darwin/amd64

Server:
 Engine:
 Version: 17.12.0-ce
 API version: 1.35 (minimum version 1.12)
 Go version: go1.9.2
 Git commit: c97c6d6
 Built: Wed Dec 27 20:12:29 2017
 OS/Arch: linux/amd64
 Experimental: false
Notice the GO version. Docker is built using the Go programming language.
The command docker is the docker client that talks to docker daemon, which is the engine of Docker platform . You will be spending most of your time (if not all of your time) with docker client. Docker client can do a wide range of things. Some are listed below:
- Build images (docker build)
- Run containers (docker run)
- Setup networking for the container
- Manage disk volumes for the container
and many more.
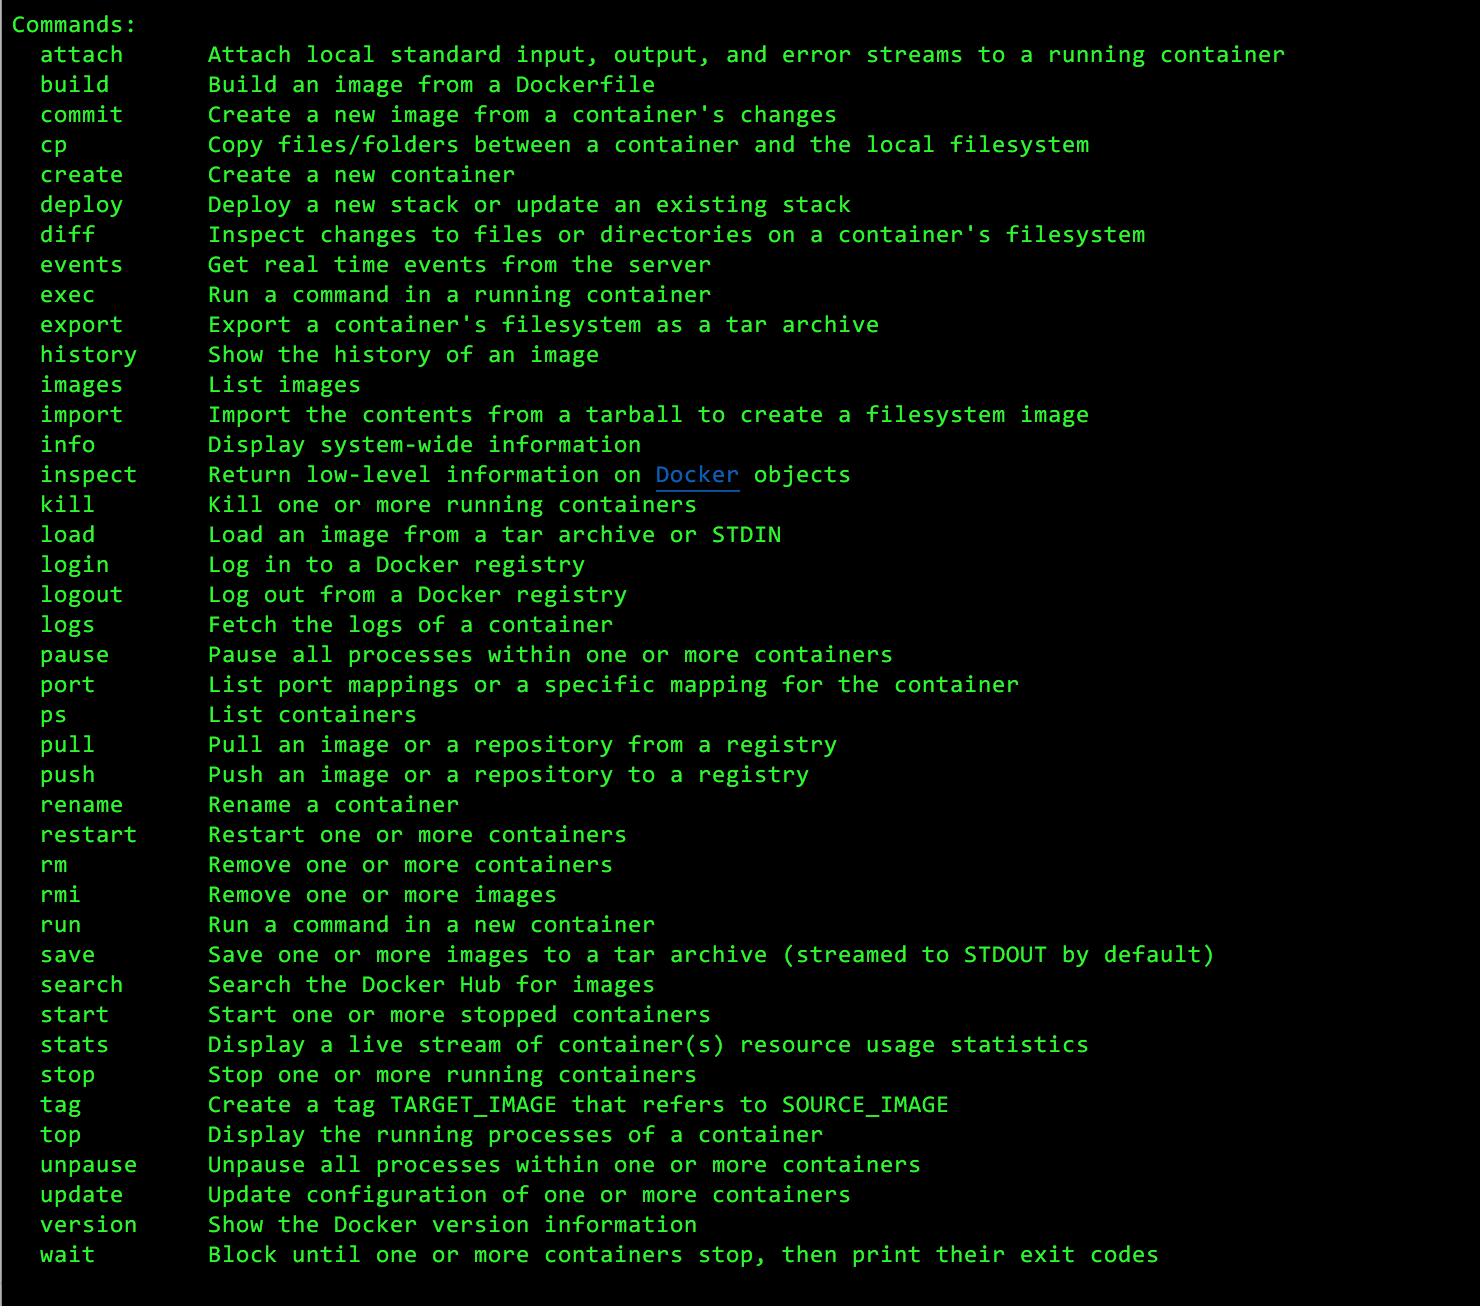
If you simply type the command docker and press Enter, you will see nice concise command list.
If you need help with any of the commands, simply type the following command:
docker <command name> –help
~$docker ps --help

Usage: docker ps [OPTIONS]

List containers

Options:
 -a, --all Show all containers (default shows just running)
 -f, --filter filter Filter output based on conditions provided
 --format string Pretty-print containers using a Go template
 -n, --last int Show n last created containers (includes all states) (default -1)
 -l, --latest Show the latest created container (includes all states)
 --no-trunc Don't truncate output
 -q, --quiet Only display numeric IDs
 -s, --size Display total file sizes
Okay, let’s get down to business. Let’s actually run a docker container.
With docker, there is this concept called images. First, you create an image and then you run the image using a container. Images should have all the necessary software to successfully run your application.
Image ——–> Docker Run ——–> Container.
Running your first container
From the shell prompt, execute the following command.
~$docker run -i -t ubuntu /bin/bash
Unable to find image 'ubuntu:latest' locally
latest: Pulling from library/ubuntu
d3938036b19c: Pull complete
a9b30c108bda: Pull complete
67de21feec18: Pull complete
817da545be2b: Pull complete
d967c497ce23: Pull complete
Digest: sha256:9ee3b83bcaa383e5e3b657f042f4034c92cdd50c03f73166c145c9ceaea9ba7c
Status: Downloaded newer image for ubuntu:latest
root@a5dfc81d2340:/#
Let’s dissect the above command.
docker: This is the docker executable
run: This tells docker to run a container
-i: This tells docker to keep STDIN open (i.e to be interactive)
-t: This tells docker to allocate a tty ( so that you get a nice terminal to type commands in)
ubuntu: This is the all important parameter – this tells docker which image to run. If the image is not available locally, docker will try to obtain the image from docker repository (hub.docker.com)
/bin/bash: This is the command to be run when the container begins running.
Open another terminal window and type the following command:
~$docker ps
CONTAINER ID IMAGE COMMAND CREATED STATUS PORTS NAMES
a5dfc81d2340 ubuntu "/bin/bash" 3 seconds ago Up 5 seconds practical_kepler
docker ps shows the containers that are currently running. Notice the container id. Also notice how the docker command borrows ps which is unix command to show the running processes.
Note: you can use the command docker ps -a show the containers that had run in the past but no longer running.
~$docker images
REPOSITORY TAG IMAGE ID CREATED SIZE
ubuntu latest c9d990395902 3 days ago 113MB
docker images shows the available images. When I ran the docker run command, it pulled the ubuntu image from hub.docker.com. Note the tag latest. Tags are how you keep various versions of the image. If no tag is specified, the default tag would be latest.
Digging deep
So, what is the nature of the container I just started ? Let’s run few commands in the container’s bash shell that was started earlier.
root@a5dfc81d2340:/# cat /etc/os-release
NAME="Ubuntu"
VERSION="16.04.4 LTS (Xenial Xerus)"
ID=ubuntu
ID_LIKE=debian
PRETTY_NAME="Ubuntu 16.04.4 LTS"
VERSION_ID="16.04"
HOME_URL="http://www.ubuntu.com/"
SUPPORT_URL="http://help.ubuntu.com/"
BUG_REPORT_URL="http://bugs.launchpad.net/ubuntu/"
VERSION_CODENAME=xenial
UBUNTU_CODENAME=xenial
So, what you got was Ubuntu 16.04.4 (from the version field).
Note: What if you want a specific version of ubuntu ? You need to go to hub.docker.com and check the available ubuntu versions.
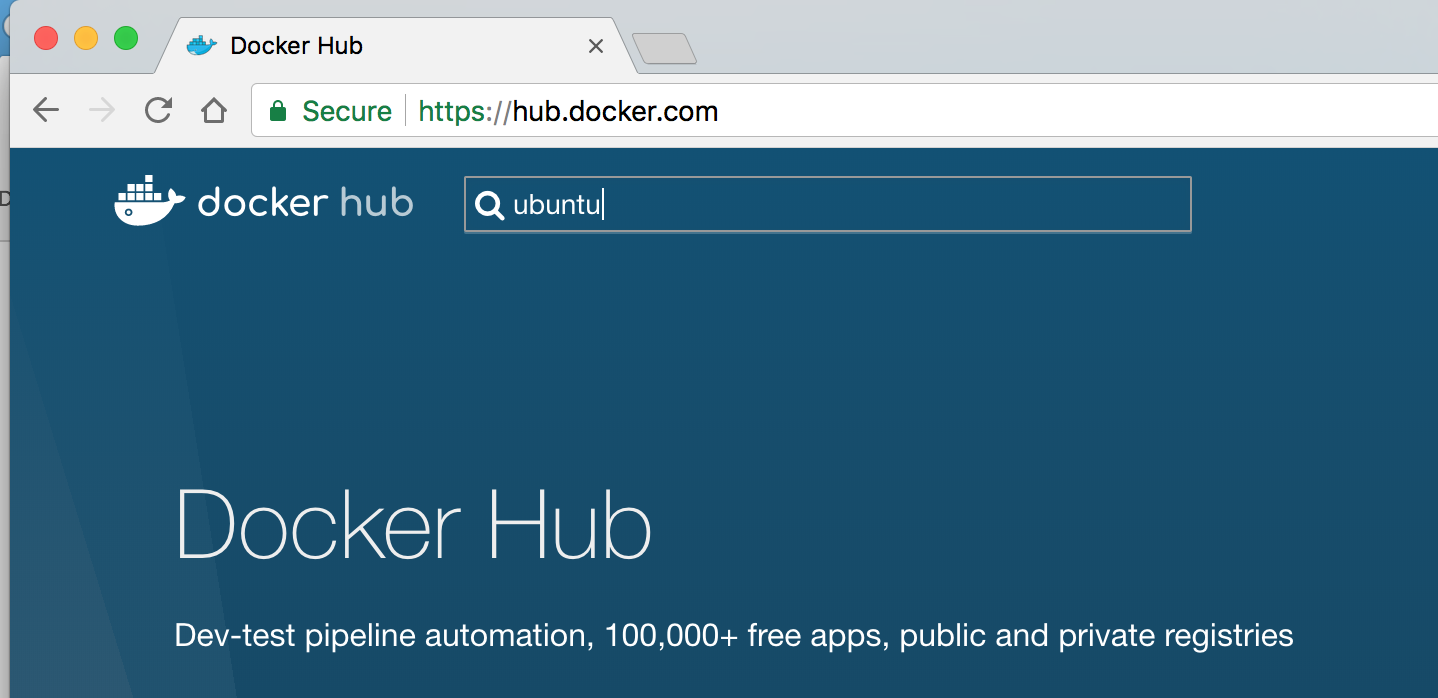
When you search for ‘ubuntu’, you get the following images:
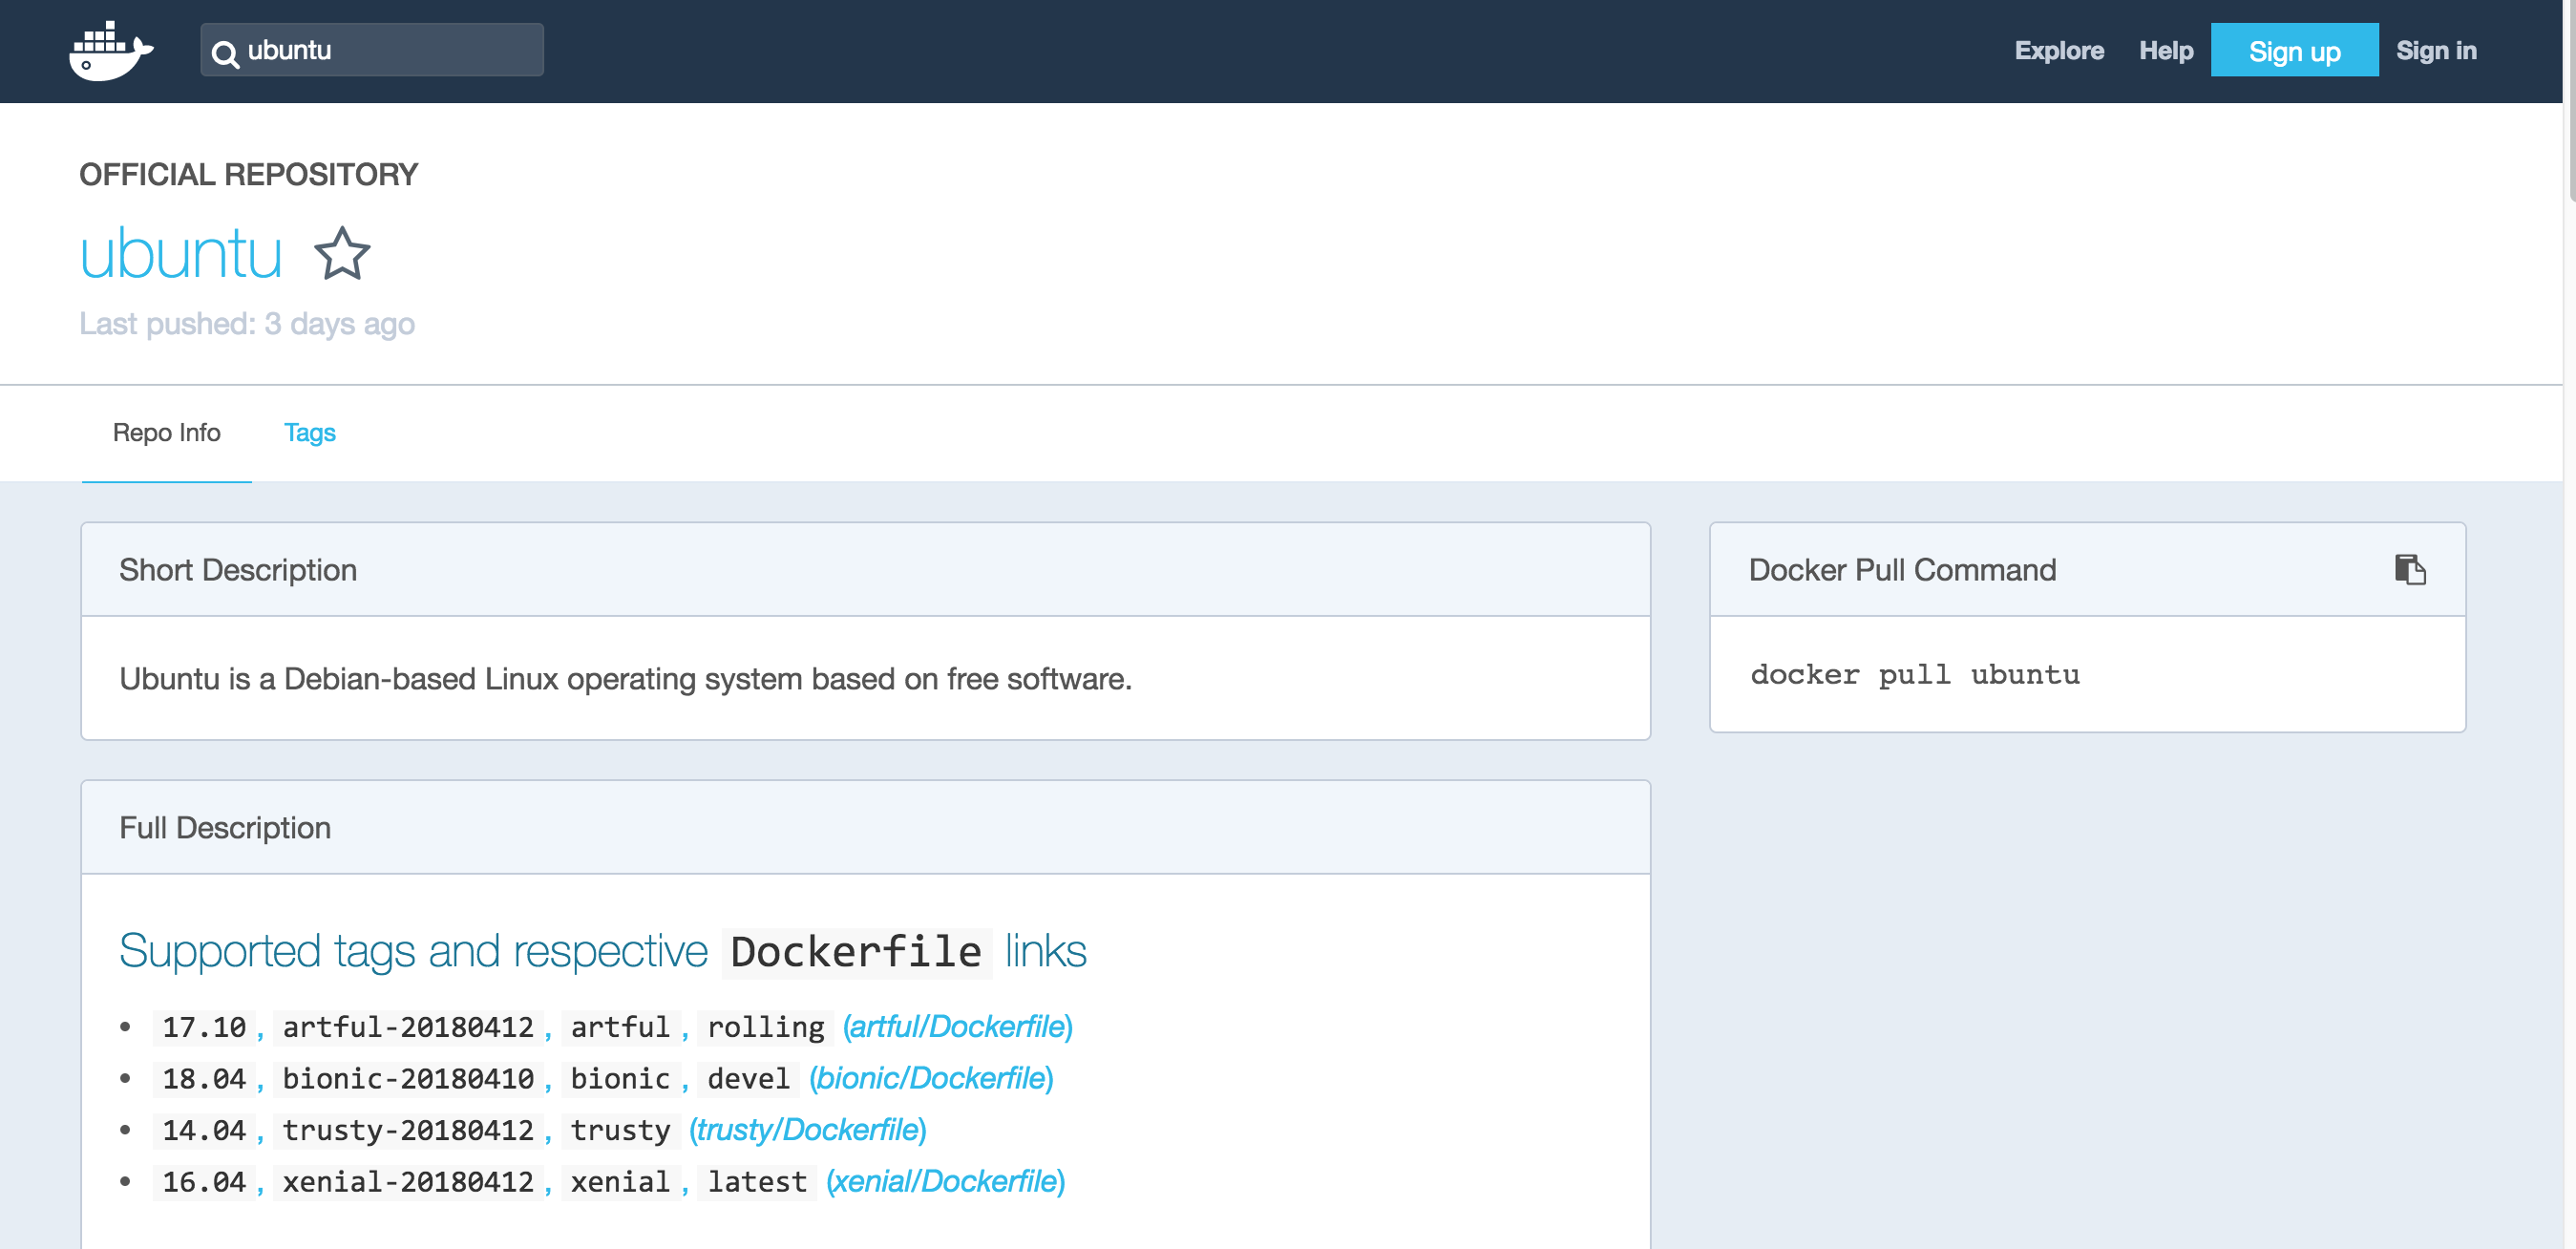
Notice the Supported tags and respective Dockerfile links (More on Dockerfile shortly). Note how 16.04 is tagged as latest. If you want ubuntu 14.04 for example, your docker run command should look like the following:
~$docker run -i -t ubuntu:14.04 /bin/bash
Unable to find image 'ubuntu:14.04' locally
14.04: Pulling from library/ubuntu
c2c80a08aa8c: Pull complete
6ace04d7a4a2: Pull complete
f03114bcfb25: Pull complete
99df43987812: Pull complete
9c646cd4d155: Pull complete
Digest: sha256:b92dc7814b2656da61a52a50020443223445fdc2caf1ea0c51fa38381d5608ad
Status: Downloaded newer image for ubuntu:14.04
root@2cbd08aaa731:/#
root@2cbd08aaa731:/# cat /etc/os-release
NAME="Ubuntu"
VERSION="14.04.5 LTS, Trusty Tahr"
ID=ubuntu
ID_LIKE=debian
PRETTY_NAME="Ubuntu 14.04.5 LTS"
VERSION_ID="14.04"
HOME_URL="http://www.ubuntu.com/"
SUPPORT_URL="http://help.ubuntu.com/"
BUG_REPORT_URL="http://bugs.launchpad.net/ubuntu/"
docker ps will show you that you are running 14.04
~$docker ps
CONTAINER ID IMAGE COMMAND CREATED STATUS PORTS NAMES
2cbd08aaa731 ubuntu:14.04 "/bin/bash" 4 minutes ago Up 4 minutes fervent_kepler
Yes, it’s that simple.
Note on Docker hub: Docker has released a new portal named Docker store (in 2016), which is aimed to be a commercial channel through which you can shop for Docker images. But for learning purposes, docker hub will do. The main difference is, docker hub images are community created, whereas docker store images are created by Software Vendors that are vetted by Docker.
There is a command line version to search images in docker repository too (of course, right?). Look at the following command:
docker search tomcat
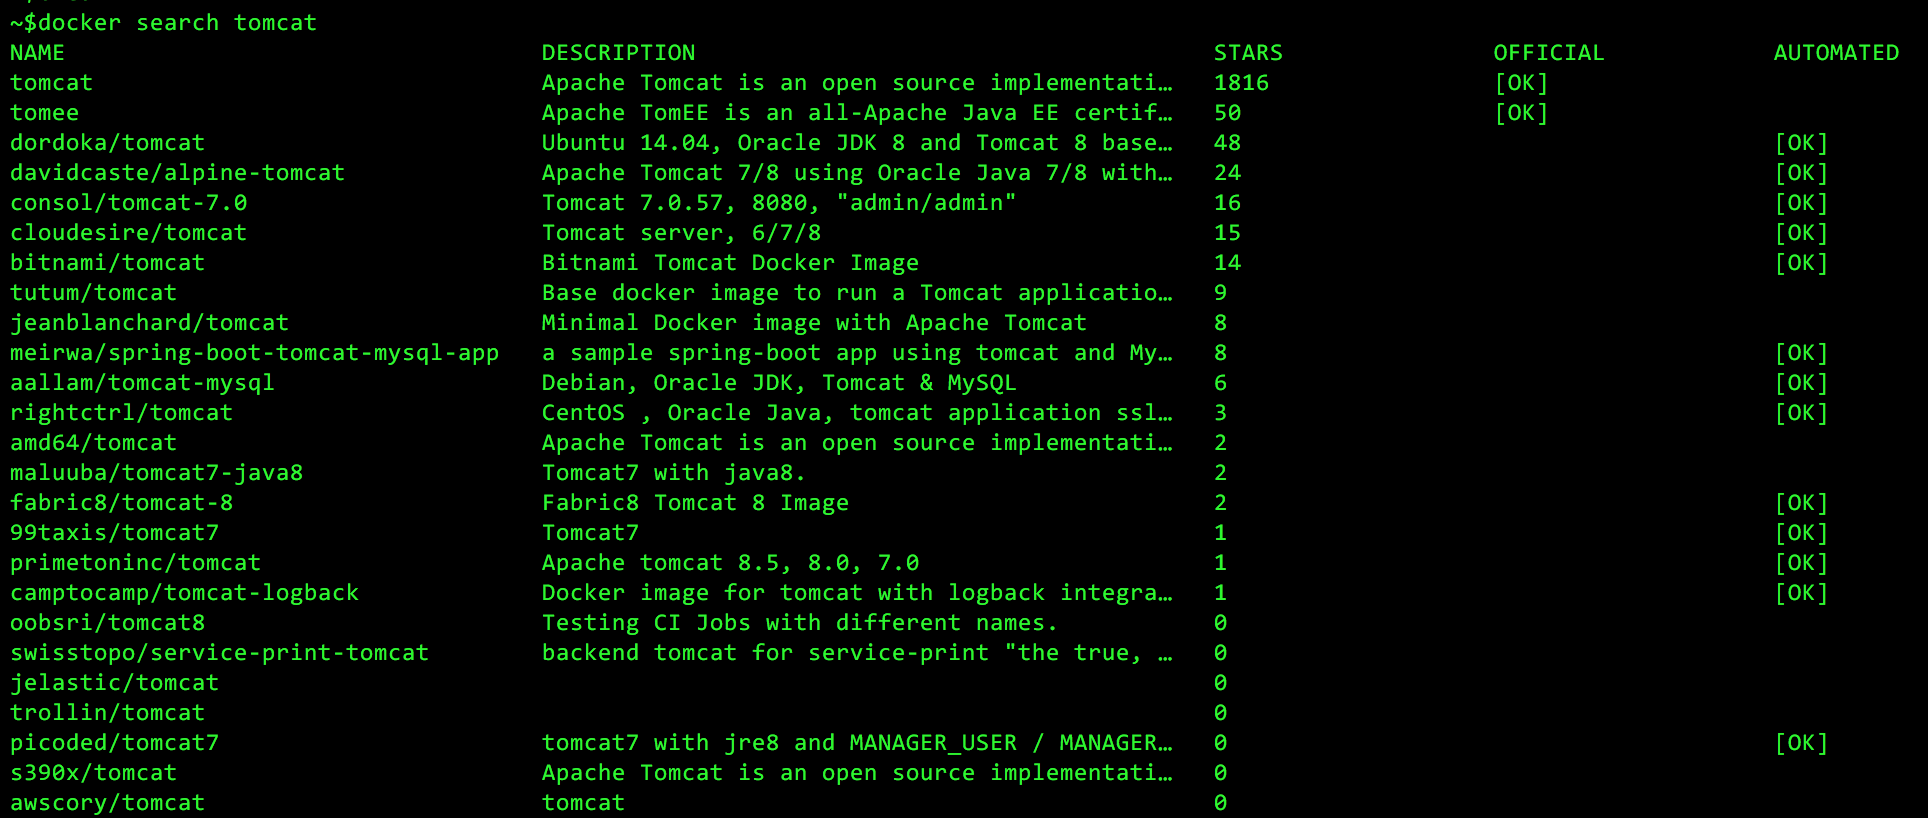
Note: the only issue with docker search is, it doesn’t show the specific tags or a given image.
Coming back to the ubuntu 16.04 container we started earlier, let’s run couple of commands in the container.
root@ff8b7428adf6:/# df -m
Filesystem 1M-blocks Used Available Use% Mounted on
overlay 64251 1447 59512 3% /
tmpfs 64 0 64 0% /dev
tmpfs 1000 0 1000 0% /sys/fs/cgroup
/dev/sda1 64251 1447 59512 3% /etc/hosts
shm 64 0 64 0% /dev/shm
tmpfs 1000 0 1000 0% /proc/scsi
tmpfs 1000 0 1000 0% /sys/firmware
df -m shows the file systems that have been mounted with their sizes in megabytes.
The beauty of docker is, all these file systems are completely isolated from the host operating system. It’s as if you are sitting in a OS inside an OS. Whatever you do to this container effects just this container (Whatever happens in container stays in the container :-)). For example, let’s say I deleted /usr and all its contents from this container. I’m toast right ? Not quite. With docker, it’s simply a matter of spinning up another container and voila, you are back in business.
Let’s take a look at what’s inside /proc

You can see it is just like a full-blown Linux system (and it is).
Now, let’s run an even more interesting command.
cat /proc/cpuinfo
In Linux, cpuinfo shows the processor information such as number of CPU cores, make of the CPU etc. What will be the output of cpuinfo when run inside the container? Where does the container get its CPU from?

It shows there are four CPUs. Where did it come from? It came from the underlying system of course. Remember, docker shares the Kernel and resources with other processes. What it sees as the number of CPUs is what the underlying system sees. In my case, my system has a 4 core processor and that’s what cpuinfo file shows.
Interacting with your container
Great going. You are getting the hang of it. Now that you have your container running, let’s see how you can interact with it.
Before you do that, one piece of advise is to name your container when you start it. If you dont’ explicitly specify a name, docker will assign a name automatically (and these names are wacky and funny and totally unpredictable). You can always use the container id that is printed when you start the container. But who has time for copy/paste? 🙂
For example, let’s start a tomcat container.
Note on tomcat: Tomcat is the eighth wonder of the world. I’m not kidding. It’s amazingly light weight and blazingly fast Java application server (Web container). I wonder what Java Web App developers will do without Tomcat. Tomcat comes with Apache web server (which is another gem of a open-source product).
Let’s start tomcat with the name tomcat_lab
~$docker run --name tomcat_lab -d tomcat
Unable to find image 'tomcat:latest' locally
latest: Pulling from library/tomcat
c73ab1c6897b: Pull complete
1ab373b3deae: Pull complete
b542772b4177: Pull complete
0bcc3741ab14: Pull complete
421d624d778d: Pull complete
26ad58237506: Pull complete
8dbabc90b2b8: Pull complete
982930be204d: Pull complete
80869be51738: Pull complete
b71ce0f0260c: Pull complete
b18814a5c704: Pull complete
444f958494eb: Pull complete
6f92b6053b75: Pull complete
Digest: sha256:65d6471ed4ab73cade79668740b94bf520b46593f5397eef3ea2222379c1a3d8
Status: Downloaded newer image for tomcat:latest
ff0f5a7cb738bf128eecf67a9da461f3ca44452bfe6ba7c60fb971707ff32fd6
~$
The -d flag starts the container in background and prints the container id.
Run docker ps to make sure the container is running.
~$docker ps
CONTAINER ID IMAGE COMMAND CREATED STATUS PORTS NAMES
ff0f5a7cb738 tomcat "catalina.sh run" 30 seconds ago Up 32 seconds 8080/tcp tomcat_lab
Did you notice the name tomcat_lab ?
Note: Container name is NOT the same as the hostname of the Linux container. By default the container ID is set as host name (the short form of container id). If you want to change this, you use the -h flag with docker command.
~$docker run --name tomcat_lab -h labweb1 -d tomcat
Ok, now let’s connect to the container and see what it looks like. If you have not started the container already, start with the command “docker run –name tomcat_lab -d tomcat“.
Unlike the ubuntu container where we created a shell when we started the container, with tomcat container you simply start it without specifying a shell to run. This is because the tomcat container by default will start tomcat server as part of the startup of the container. To be specific, the container starts up the command ‘catalina.sh’ that was set through the CMD command configured in its dockerfile (more on Dockerfile shortly).
In order to connect to the tomcat container via a shell, we use the docker exec command.
~$docker exec -it tomcat_lab /bin/bash
root@tomcat_lab:/usr/local/tomcat#
Docker exec runs a command on a running container.
Notice how you landed on /usr/local/tomcat directory. This is defined by the WORKDIR command in the container’s dockerfile.
Let’s run couple of commands inside the container:
root@tomcat_lab:/usr/local/tomcat# ls

LICENSE  RELEASE-NOTES bin   include  logs       temp workNOTICE RUNNING.txt conf  lib      native-jni-lib  webapps
Show the tomcat version by running the command bin/version.sh.
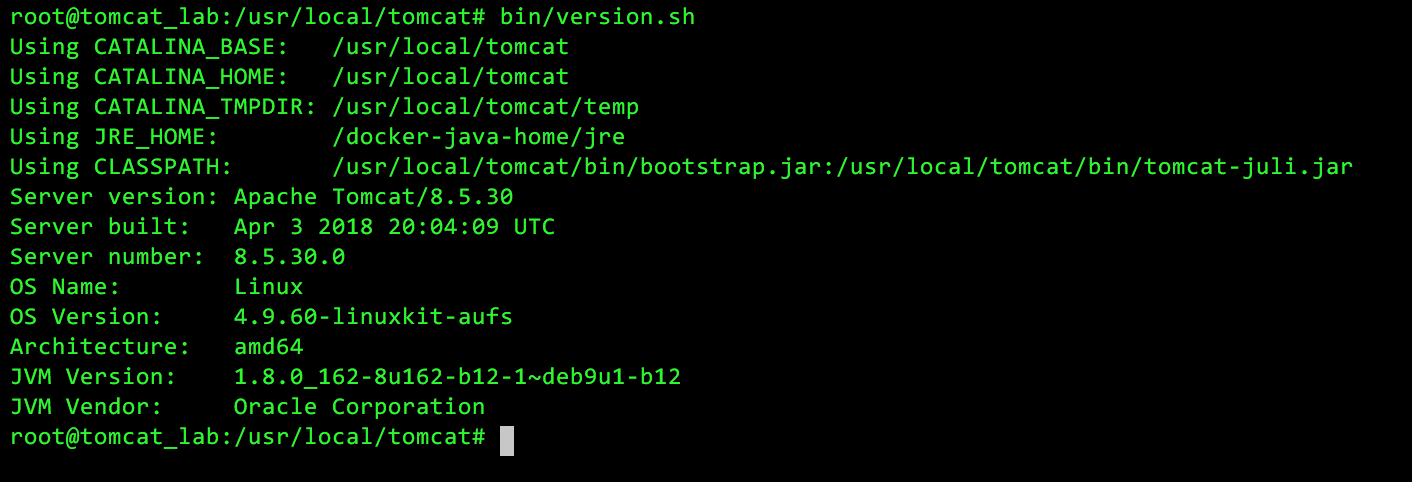
So, we know we received Tomcat 8.5.30. It also came with Java 1.8.0. Nice !!
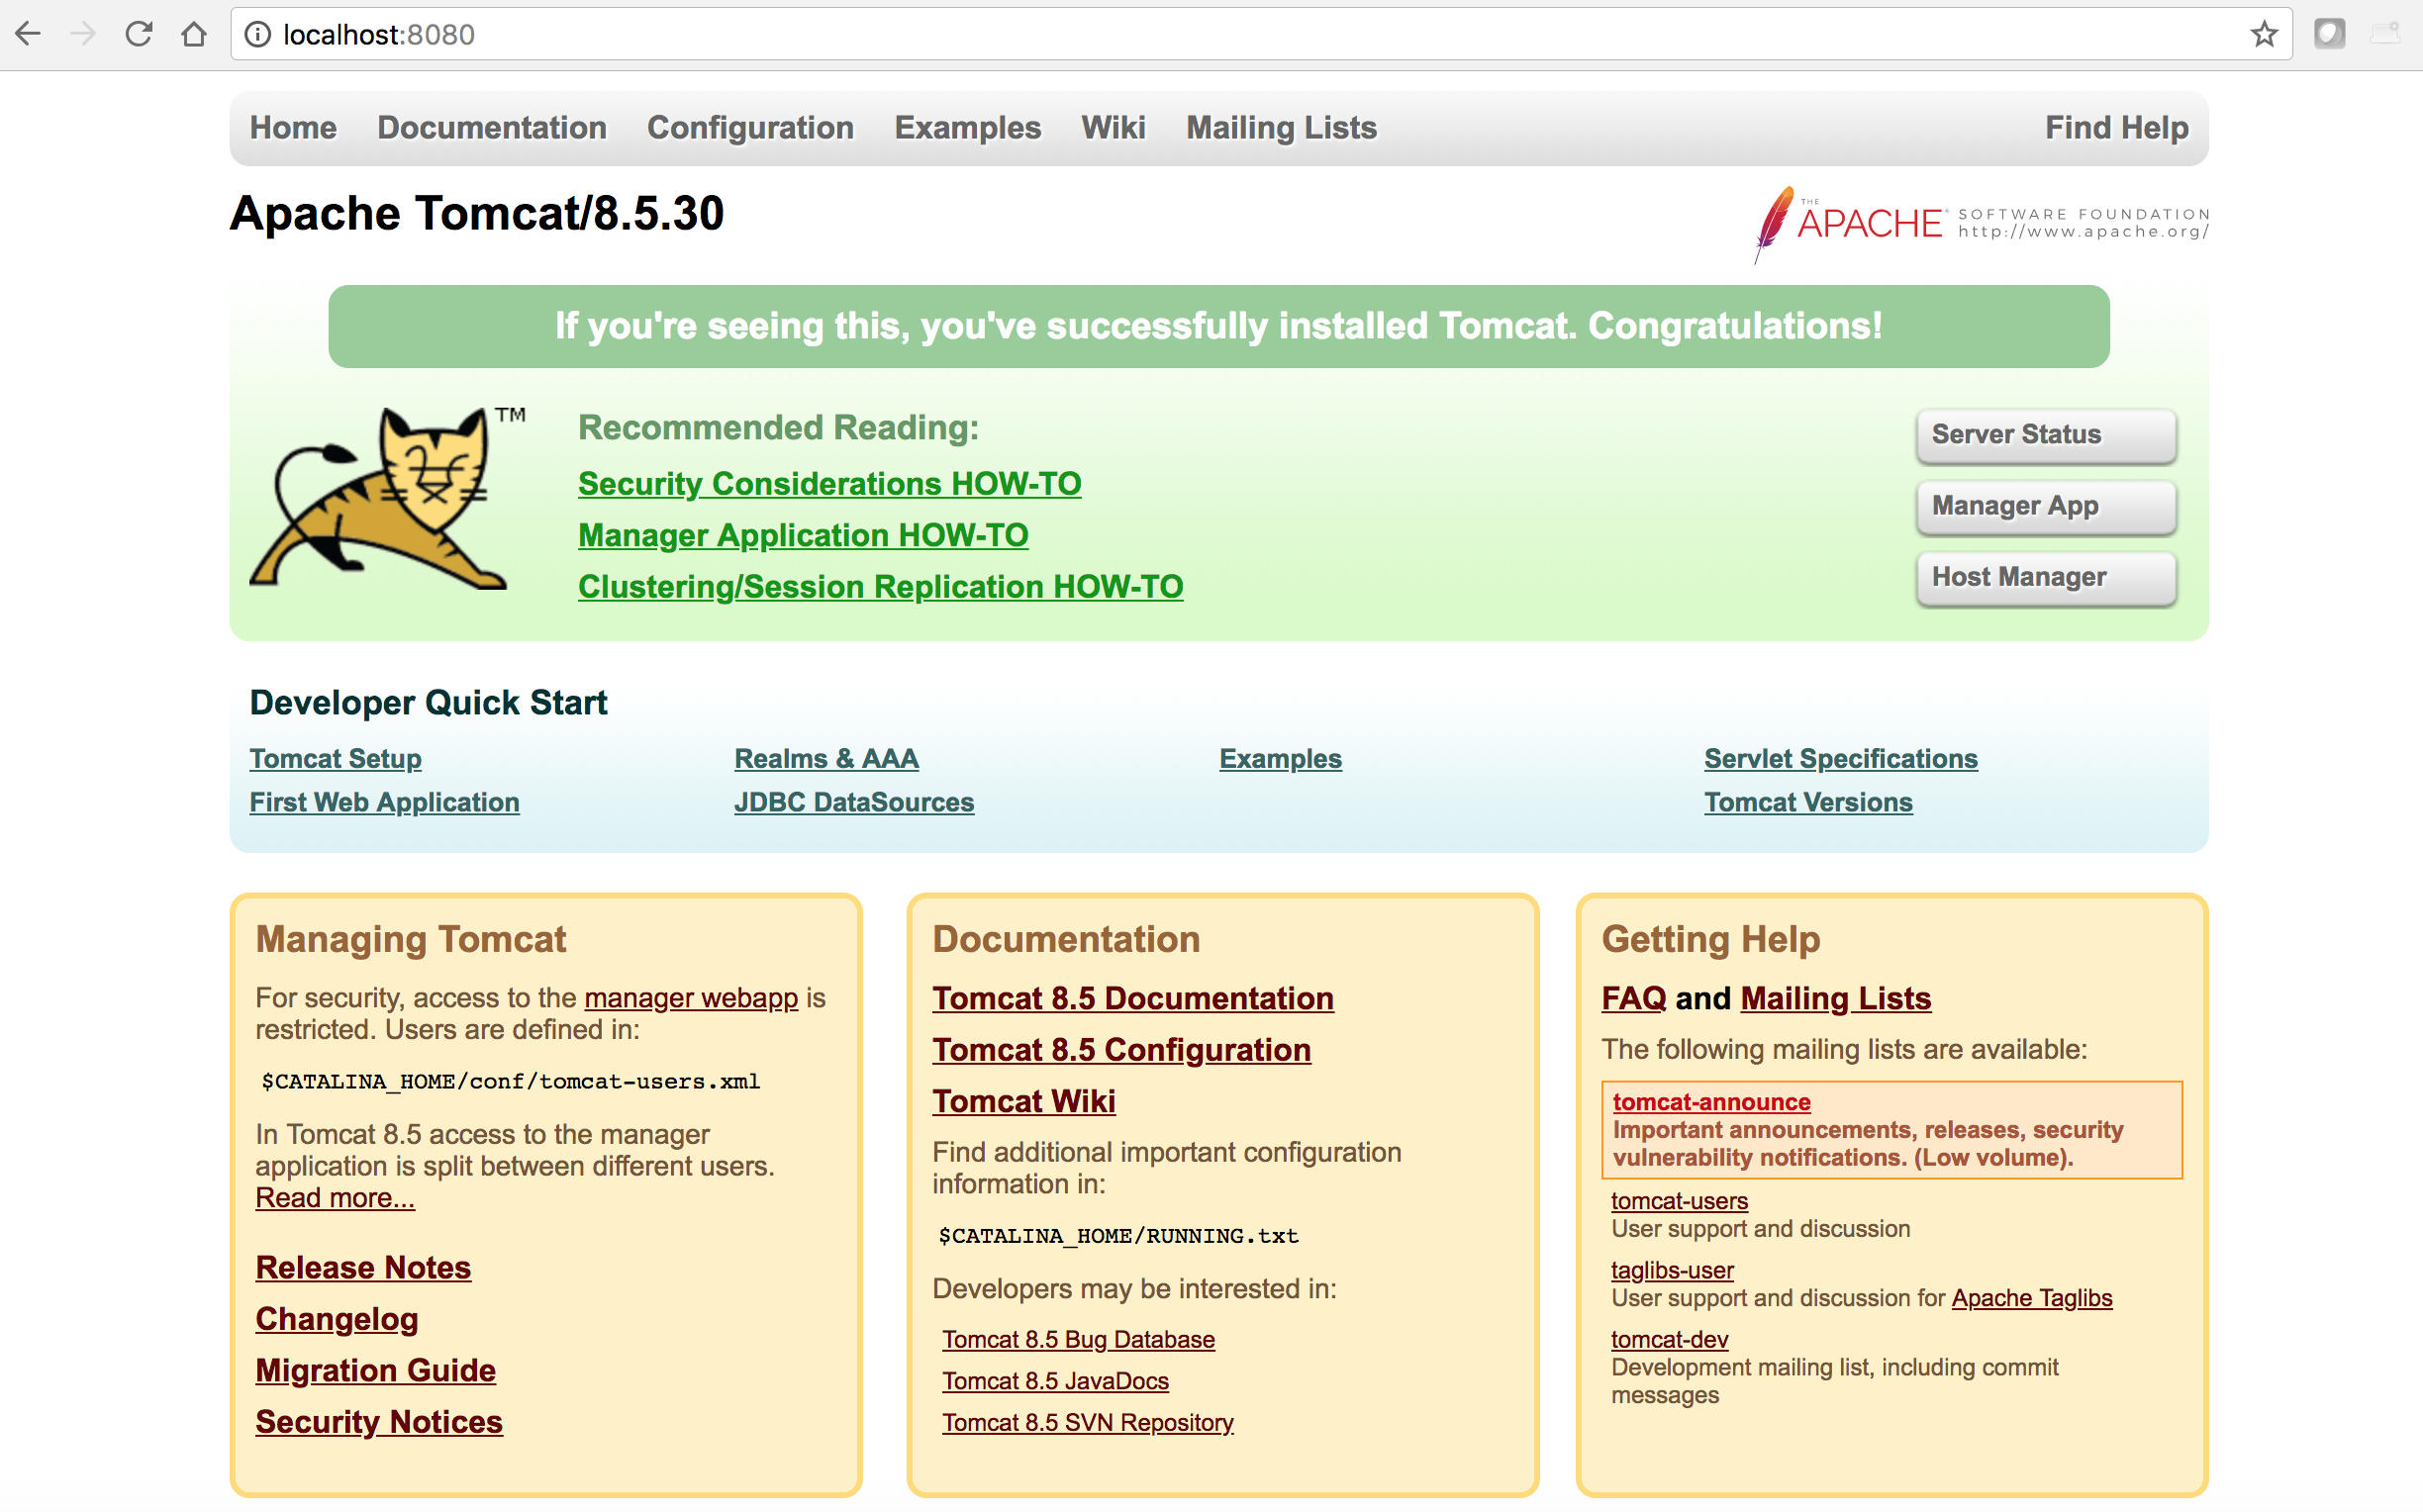
Tomcat by default listens on HTTP port 8080. So, let’s try to access our freshly minted tomcat which is running in a docker container. From your local internet browser, go to http://localhost:8080

oh-oh. What went wrong ?
Here’s a crucial fact about Docker networking. The ports listening inside the docker container are NOT accessible from outside the container, unless we explicitly configure a port mapping. This is why I’m unable to access tomcat from my browser (which is running outside the container).
In order to map port 8080 of the container to a port on my system, we start the container with the ‘-p’ flag.
Exit the current container, stop it and remove it.
root@tomcat_lab:/usr/local/tomcat/logs# exit
exit
~$docker ps
CONTAINER ID IMAGE COMMAND CREATED STATUS PORTS NAMES
2198f0541ab5 tomcat "catalina.sh run" 3 days ago Up 3 days 8080/tcp tomcat_lab
~$docker stop tomcat_lab
tomcat_lab
~$docker rm tomcat_lab
tomcat_lab
Note: If you don’t explicitly delete your container, it sits in your system in ‘stopped’ status. And you won’t be able to re run ‘docker run’ on a stopped container (You can only run ‘docker start’ on a stopped container)
Run the container with port 8080 of the container mapped to port 8080 in your system.
~$docker run --name tomcat_lab -p 8080:8080 -d tomcat
2c4a0ac39d1077ecebf8b2ee0df621fd9abe39431b2eb32cb6dfde35a2a47c92
Note: You can pick any unused port in your system. You don’t have to pick 8080.
Now, let’s access tomcat via the browser.
** AWESOMENESS **
You were able to install and run tomcat with a single command. Isn’t that cool? You can take a breath and bask in the moment of glory.
There are two additional important concepts I would like to touch before I wrap this up.
- Attaching local disk volumes to docker
- Using Dockerfile to construct images
Let’s tackle the disk volumes first.
As I mentioned before, the container is a self-contained entity. All components, including Network, files, file systems, processes etc are enclosed within the container. But what if I want to update a file ‘inside’ your container, from outside ? For example, let’s say I would like to deploy a new web application in the tomcat container (dropping a war file in /usr/local/tomcat/webapps/, for instance). One way to do this is to copy my war file into my image when I build it – using Dockerfile (more on this shortly). But what if I did not build my image using a Dockerfile (because I simply pulled a ready-made image from docker hub, such as the one we did for tomcat). And what if I want to keep updating my war file frequently ? I don’t want to be rebuilding my image whenever I make a change.
Volumes to rescue.
Volumes enable container to read and write data to file systems that are OUTSIDE of the container life cycle. And the contents of the volume do NOT increase the size of the container.
Now, there are two ways to integrate volumes into a docker container.
- Bind mounts
- Named volumes
With Bind mounts, a file or directory on the Docker host machine is mounted into a container. If the file or directory does not exist, Docker will create it. With named volumes, Docker creates a directory under Docker storage directory on the host machine. Named volumes have many advantages over bind mounts. Couple of them are listed below:
- Since Docker manages the named volumes, we can use docker client and API to manage them
- Bind mounts rely on the host machine’s file system having a specific directory structure available. This can be problematic in some situations.
Docker recommends to use named volumes instead of bind mounts. Let’s see how both of them are configured.
Bind mounts
Like I mentioned, with bind mount a file or directory on the Docker host machine is mounted into a container.
For instance, let’s say I have a web application directory named sample in my docker host. I would like to mount this directory into the container’s /usr/local/tomcat/webapps/sample directory. So, when my container starts running, it will load the web application (Tomcat loads all valid J2EE complaint web applications in the /usr/local/tomcat/webapps directory). In this way, if I update my application in my docker host, it will be reflected in the docker container. Can we try it?
Note: The application ‘sample’ is provided by tomcat for learning purposes. It’s a very small app with couple of web pages in them. For our exercise, this application is perfect. I’ve downloaded the sample app and stored it my local Docker host under /tmp.
~$ls /tmp/docker/webapps/sample/
META-INF WEB-INF hello.jsp images index.html

~$docker run --name tomcat_lab \
> --rm \
> -d -p 8080:8080 \
> --mount type=bind,source=/tmp/docker/webapps/sample,target=/usr/local/tomcat/webapps/sample \
> tomcat
4be2b9af5f961c242e995b2f74ae65a435b3814aed7a19f6899d5eb686f7a699
Note: I added –rm flag so that the container will be deleted when it is stopped ( a convenient way to clean up).
Let me show a very useful command to get runtime configuration information about a container.
~$docker inspect tomcat_lab
....
....
"Mounts": [
 {
 "Type": "bind",
 "Source": "/tmp/docker/webapps/sample",
 "Destination": "/usr/local/tomcat/webapps/sample",
 "Mode": "",
 "RW": true,
 "Propagation": "rprivate"
 }
 ],
....
....
The output of docker inspect includes, among many other, data volumes information. From the output above, you can tell our mount worked perfectly. Before we see what has happened to the container, a quick note about the –mount syntax.
–mount is followed by key value pairs to configure the mapping between local and container mount directories.
type=bind tells docker to mount it using bind (the other valid values are ‘volume‘ and ‘tmpfs‘. We’ll learn about volumes shortly.
source=/tmp/docker/webapps/sample tells docker the source directory. This is the directory in docker host. Note that this doesn’t have to exist. If it doesn’t Docker will create it.
target=/usr/local/tomcat/webapps/sample tells docker the destination directory. This is the directory in the container.
There is also a read only option you can add. If readonly=true is set, the container mounts the directory in read-only mode. This can be useful in some situations.
Note: instead of –mount, you can also use -v option to mount volumes. But –mount is clearer to understand and in fact, Docker recommends using –mount instead of -v.
OK, let’s connect to the container and take a look.
~$docker exec -it tomcat_lab /bin/bash
root@b945aa0c8e8a:/usr/local/tomcat# cd webapps/
root@b945aa0c8e8a:/usr/local/tomcat/webapps# ls
ROOT docs examples host-manager manager sample
root@b945aa0c8e8a:/usr/local/tomcat/webapps# cd sample/
root@b945aa0c8e8a:/usr/local/tomcat/webapps/sample# ls
META-INF WEB-INF hello.jsp images index.html
Nice, let’s access the web app.
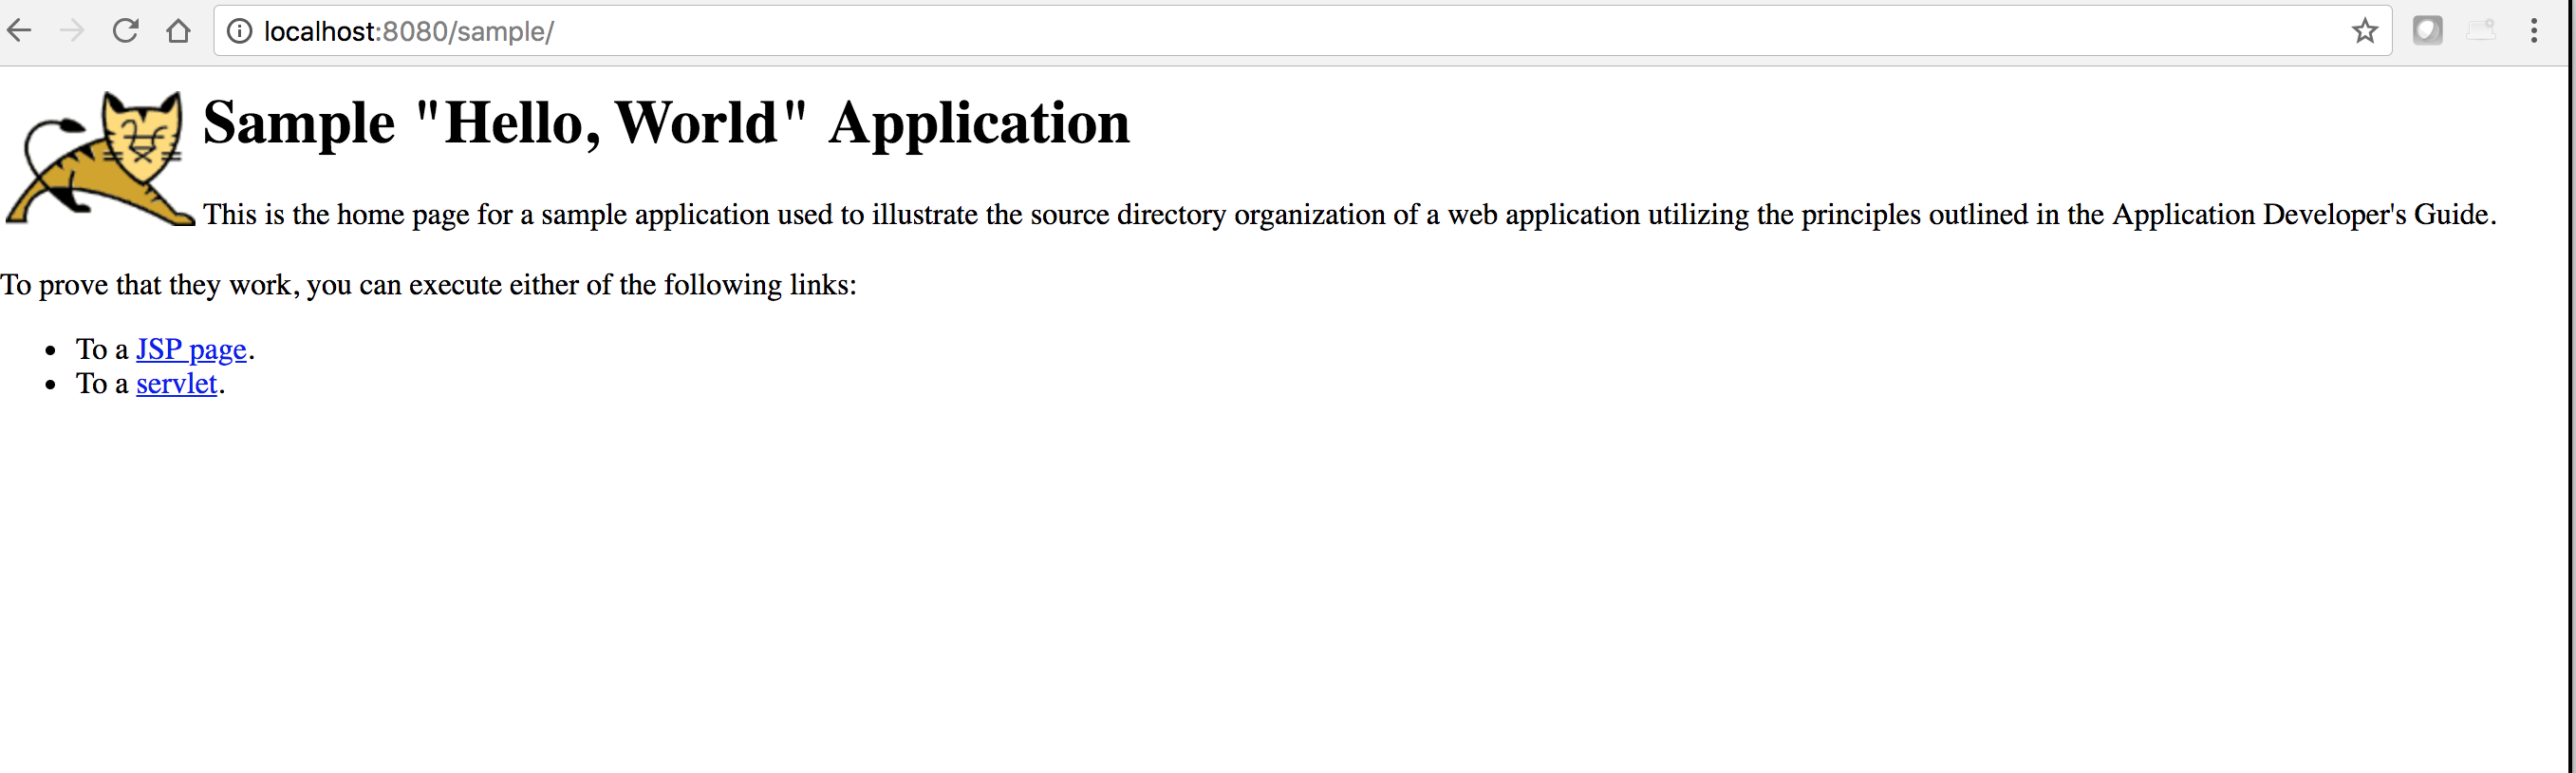
Great. You can see the home page of the sample application. This page is coming from index.html (/usr/local/tomcat/webapps/sample/index.html), which is actually residing in the Docker host’s /tmp/docker/webapps/sample/).
Now, let’s say I want to change the background color of index.html. If we didn’t have the local volume mount, you would have to rebuild the image by copying the updated index.html in to the container. Pretty nasty. Luckily, since we have the volume mount already in place, all I have to do is update Docker hosts’s /tmp/docker/webapps/sample/index.html and it will immediately take effect in the container. Let’s try.
/tmp/docker/webapps/sample$cat index.html
<html>
<head>
<title>Sample "Hello, World" Application</title>
</head>
<!-- Changing the background color from white to grey -->
<body bgcolor=grey>
...
...
I simply used ‘vi’ to edit the background color in index.html (changed white to grey).
Let’s refresh the web page to see the magic.
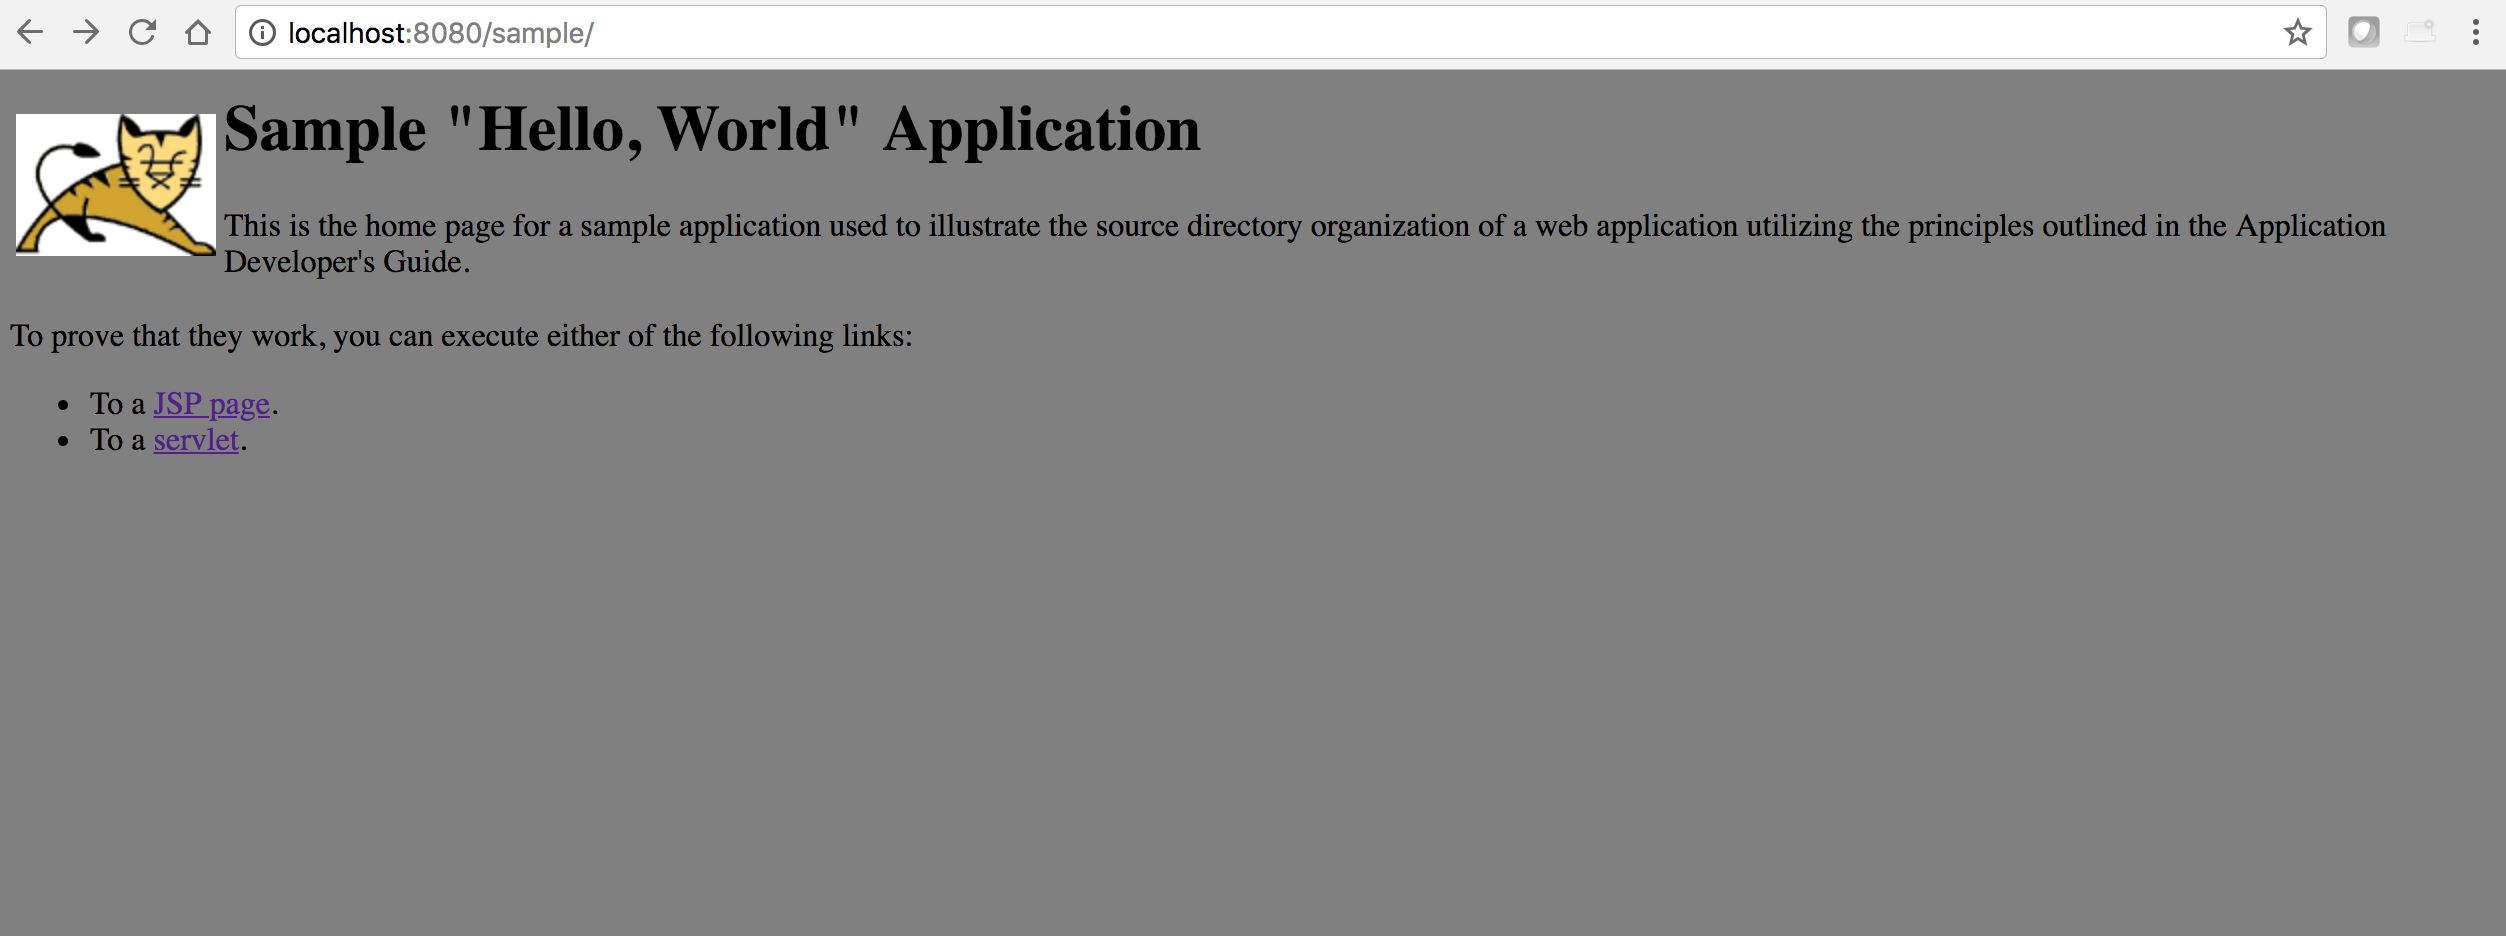
There you go. The changes in your local docker host reflected in the container.
Wait. What if you make a change to index.html inside the container? Will index.html in Docker host’s file system get updated too? Absolutely. The change id bidirectional.
Note: You can mount the volume in ‘read only‘ mode, in which case the container will NOT be able to update the files that are mounted from the Docker host’s file system.
Volume Mounts
With volume mounts, Docker manages the entire life-cycle of the Volume. Volume mounts are also called named volumes. Docker strongly recommends volume mounts over bind mounts. There are many, many advantages of using volumes over Bind mounts. I’ve listed some of them below:
- With Bind mounts, a directory structure is expected to be present in the Docker host. But with volume mount, docker manages the volumes under Docker area (/var/lib/docker/volumes on Linux). Volumes somewhat decouple the Docker host from the volume.
- You can easily share and/or migrate volumes. Multiple containers can use the same volume simultaneously (even read-write).
- You can use volumes when docker is running in a cloud environment and you want to use the disk storage of the Cloud provider
Okay, let’s look at few volume management commands.
List existing volumes:
~$docker volume ls
DRIVER VOLUME NAME
As you can see, there are no volumes currently.
Create a volume:
~$docker volume create web-vol
web-vol
~$docker volume ls
DRIVER VOLUME NAME
local web-vol
~$docker volume inspect web-vol
[
 {
 "CreatedAt": "2018-05-21T11:27:37Z",
 "Driver": "local",
 "Labels": {},
 "Mountpoint": "/var/lib/docker/volumes/web-vol/_data",
 "Name": "web-vol",
 "Options": {},
 "Scope": "local"
 }
]
~$
docker volume inspect <volume name> command outputs important configuration parameters about the volume (such as Mountpoint).
If you want to remove a volume, use the ‘rm’ command
~$docker volume rm web-vol
web-vol
Important note: In Docker For MAC, Docker actually runs inside a VM. So, the mount point /var/lib/docker/volumes/web-vol/_data is actually in the VM and NOT in the host MAC system. If you were to run docker on a Linux machine, you could simply ‘cd’ to that directory and view contents. For the seriously curious, you can crank up an alpine Linux container and bind mount “/” to take a peek.
~$docker run --name alpine -it -v /:/mac-vm-root alpine /bin/sh
Unable to find image 'alpine:latest' locally
latest: Pulling from library/alpine
ff3a5c916c92: Pull complete
Digest: sha256:7df6db5aa61ae9480f52f0b3a06a140ab98d427f86d8d5de0bedab9b8df6b1c0
Status: Downloaded newer image for alpine:latest
/ # cd /mac-vm-root/
/mac-vm-root # ls
Users dev libau.so opt proc sendtohost tmp
Volumes etc libau.so.2 port run start-docker.sh usr
bin lib libau.so.2.9 private sbin sys var
/mac-vm-root # ls /mac-vm-root/var/lib/docker/volumes/web-vol/
_data
But for the rest of us, just know that docker will manage the volume for us.
Whether you volume mount or bind mount, if there is already data in the target directory (i.e the Container’s directory where you mount), couple of things to note:
- If the source directory on the host is empty, the contents of Container’s data in the target directory is copied (i.e probabgated) to the Docker host.
- If the source directory on the host is NOT empty, the contents are obscured by the contents of the Docker container. By ‘obscured’ I mean the original content of the source will still be there in the mount, but it won’t be accessible until it is unmounted (i.e the container stopped).
Great going guys, now that you have few core Docker concepts under your belt, let’s move on to building an image from Dockerfile. This is where some serious fun begins.
Using Dockerfile to build your images
What is a Docker image?
An image is an executable binary package that contains everything needed to run an application. An image typically includes application code, base OS, software libraries and configuration files. You launch a container by running an image. In other words, container is a running instance of an image.
So, whenever you are running the command docker run , you are actually running an image as in, docker run <image name>
~$docker run hello-world
Unable to find image 'hello-world:latest' locally
latest: Pulling from library/hello-world
9bb5a5d4561a: Pull complete
Digest: sha256:f5233545e43561214ca4891fd1157e1c3c563316ed8e237750d59bde73361e77
Status: Downloaded newer image for hello-world:latest

Hello from Docker!
This message shows that your installation appears to be working correctly.

To generate this message, Docker took the following steps:
 1. The Docker client contacted the Docker daemon.
 2. The Docker daemon pulled the "hello-world" image from the Docker Hub.
 (amd64)
 3. The Docker daemon created a new container from that image which runs the
 executable that produces the output you are currently reading.
 4. The Docker daemon streamed that output to the Docker client, which sent it
 to your terminal.

To try something more ambitious, you can run an Ubuntu container with:
 $ docker run -it ubuntu bash

Share images, automate workflows, and more with a free Docker ID:
 https://hub.docker.com/

For more examples and ideas, visit:
 https://docs.docker.com/engine/userguide/
In the above example hello-world is the image.
When you try to launch a container by running an image, the docker daemon in the docker host (where you are running this command) first checks the local repository for that image (The images are stored under /var/lib/docker/image in Unix platforms). If an image is not found, it tries to look for the image in docker public repository.
There are tons of images already built and ready-to-use at docker public repository (hub.docker.com or store.docker.com). However, in almost all practical cases, you will want to build your own custom image. Dockerfile is the all-important configuration file that you create to define what goes into an image. You would then use docker build command to build the image. Let’s build an image using dockerfile.
Let’s say I want to build an image that has the following software in it.
- Ubuntu 16.04 as the base OS
- Nginx Web Server
- Python
First, create a text file named Dockerfile in any empty directory.
/var/tmp$mkdir mydocker
/var/tmp$cd mydocker
/var/tmp/mydocker$vi Dockerfile
The directory in which you are going to be building the image (i.e from where you will be running the docker build command) is the context for the docker daemon. (/var/tmp/mydocker is the context in the above example). All the contents of this directory is sent to docker daemon for building the image. So, it is imperative that you only keep the files that you are going to be including in your image in this directory.
# Dockerfile to build nginx-python-on-ubuntu image
# This is the base image.
FROM ubuntu:16.04
RUN apt-get update && \
 apt-get install -y curl \
 nginx \
 python3.5
# Nginx Listen port. This port must be published using "-p" option of the 'docker run' command.
EXPOSE 80
# copy my code
COPY dockerwins.html /var/www/html/
# Start nginx
CMD ["/usr/sbin/nginx"]
Let’s go through the file line by line.
# Dockerfile to build nginx-python-on-ubuntu image
# This is the base image. Many Docker images have some version of Linux as the Base image.
The above two lines, as you may have already guessed, are comments. Comments begin with the character “#”. As a best practice, always include detailed comments. Note that comments must appear in their own lines, i.e they cannot start in the middle of the line.
For example, the following Dockerfile will result in a an error when building.
FROM ubuntu:16.04 # Getting Ubuntu 16.04
Next,
FROM ubuntu:16.04
This is a biggie. The FROM instruction sets the base image on which your image is going to be built. Docker uses a layered approach to building image. Each instruction in a Dockerfile gets applied to the image that resulted from the previous stage. The FROM instruction defines the starting point for this layered building approach. You can find hundreds of images in docker hub (hub.docker.com) that you can use as base image.
The FROM instruction must be the first instruction in a docker file.
The only exception is the ARG statement which can be used to accept command line parameters through the docker build –build-arg command.
Next let’s look at the RUN command.
RUN apt-get update && \
 apt-get install -y curl \
 nginx \
 python3.5
The RUN instruction executes the command specified on top of the current image and commits the results, creating an updated image. You can have multiple RUN instructions (very common) to apply layers of updates to the image being built.
In the above example, the RUN command uses apt-get ubuntu command to install curl, nginx and python3.5.
EXPOSE 80
To your surprise, the expose command does not actually expose any ports. Rather it acts as documentation for someone who would use this image to crank up a container. In the above statement, port 80 indicates the default port nginx listens on. When starting up a container using this image, one must use -p option of docker run command to expose (in the true sense) port 80 to the outside world.
COPY
COPY command copies files from host system into Docker container. This is one of the ways your application code (for example, a jar file) can be copied into the docker container.
Syntax of COPY command:
COPY <src> <dest>
Note that src is relative to the build context, which is the directory where Dockerfile is present.
dest is the location in the docker container. If an absolute path is not provided for dest, it will be taken as relative to the value assigned using WORKDIR command in the Dockerfile (which must appear prior to the COPY command).
If src is a directory, the entire contents (including any subdirectory) will be copied to dest. You can use wildcards in src.
dest must have a trailing / if you want to copy the contents under dest (i.e dest is a directory). Without a trailing /, dest is considered as a file.
Let’s take the following examples:
Copy dockerwins.html from the build context directory (which is /var/tmp/mydocker in my example) to /var/www/html directory in the docker container.
COPY dockerwins.html /var/www/html/
Copy the entire contents of myapp directory in to /opt/app directory in the docker container.
COPY myapp /opt/app/
Note that the src is relative to the build context. So, if specify /myapp in src, it is actually /var/tmp/mydocker/myapp (because Dockerfile is present in /var/tmp/mydocker). On the other hand, if you specify the absolute path for dest, it denotes the exact absolute path on the container – it is taken as it is (i.e /opt/app in the container). If you specify the relative path for dest (i.e without the / at the beginning of the path), the path is taken as relative to the WORKDIR value. Let’s look at an example.
# Copy contents of resources folder from docker host to /opt/app/resources at the container.
WORKDIR /opt/app

COPY resources resources/
Note on permissions on the files being copied:
By default, files with be copied with owner and group as root:root (with uid 0 and gid 0). If you need the files owned by other user/group, first you need to create the user/group using unix useradd and groupadd commands (using RUN command in dockerfile). You can then use chown (again, using the RUN command in dockerfile) to change the permissions.
Let’s move on to the last command – CMD.
CMD ["/usr/sbin/nginx"]
There can be only one CMD command in a Dockerfile. (If there is more than one, only the last CMD command takes effect). Dockerfile must have at least one CMD or ENTRYPOINT commands.
CMD command is used in two ways:
- specify the executable that the container must run when started
- Provide the default parameters for the ENTRYPOINT command (in this case, CMD does not specify an executable).
In our example, CMD is used to specify the executable that must be run, which is /usr/sbin/nginx.
Syntax of the CMD is as follows:
CMD [“<executable to run>”, “<arg1>”,”<arg2>”]
Note: If you specify an argument as part of docker run command, CMD will be ignored. For example, when you run docker -it ubuntu /bin/bash, regardless of CMD, /bin/bash will be executed.
To understand more about how ENTRYPOINT and CMD interacts, I strongly advise you to checkout this page.
Great, let’s go ahead and build our image.
/var/tmp/mydocker$docker build -t ubuntu_lab_image:1.0 .
Sending build context to Docker daemon 3.072kB
Step 1/5 : FROM ubuntu:16.04
 ---> 0b1edfbffd27
Step 2/5 : RUN apt-get update && apt-get install -y curl nginx python3.5
 ---> Running in 884dcb896137
Get:1 http://security.ubuntu.com/ubuntu xenial-security InRelease [107 kB]
Get:2 http://archive.ubuntu.com/ubuntu xenial InRelease [247 kB]
Get:3 http://security.ubuntu.com/ubuntu xenial-security/universe Sources [81.2 kB]
Get:4 http://security.ubuntu.com/ubuntu xenial-security/main amd64 Packages [652 kB]
Get:5 http://archive.ubuntu.com/ubuntu xenial-updates InRelease [109 kB]
Get:6 http://archive.ubuntu.com/ubuntu xenial-backports InRelease [107 kB]
Get:7 http://archive.ubuntu.com/ubuntu xenial/universe Sources [9802 kB]
Get:8 http://security.ubuntu.com/ubuntu xenial-security/restricted amd64 Packages [12.7 kB]

...

Processing triggers for sgml-base (1.26+nmu4ubuntu1) ...
Processing triggers for systemd (229-4ubuntu21.2) ...
Removing intermediate container 884dcb896137
 ---> fe30a31bbc60
Step 3/5 : EXPOSE 80
 ---> Running in ae9d84de3391
Removing intermediate container ae9d84de3391
 ---> 2bca4d5c0e5f
Step 4/5 : COPY dockerwins.html /var/www/html/
 ---> 3364bf556c7f
Step 5/5 : CMD ["/usr/sbin/nginx"]
 ---> Running in 12192cdba527
Removing intermediate container 12192cdba527
 ---> 33dcfa1d4d89
Successfully built 33dcfa1d4d89
Successfully tagged ubuntu_lab_image:1.0
As you can see, docker daemon shows the progress of each step as it builds the image. If all goes well, docker outputs the image id at the end and the image is ready to be run. Let’s go ahead and run it.
/var/tmp/mydocker$docker run --name ubuntu_lab -d -p 80:80 ubuntu_lab_image:1.0
e5657c6c82b98990a49f69585f53b65c82d709847da9dfbd6077ef1f4b5431db
OK, let’s try accessing our test html page
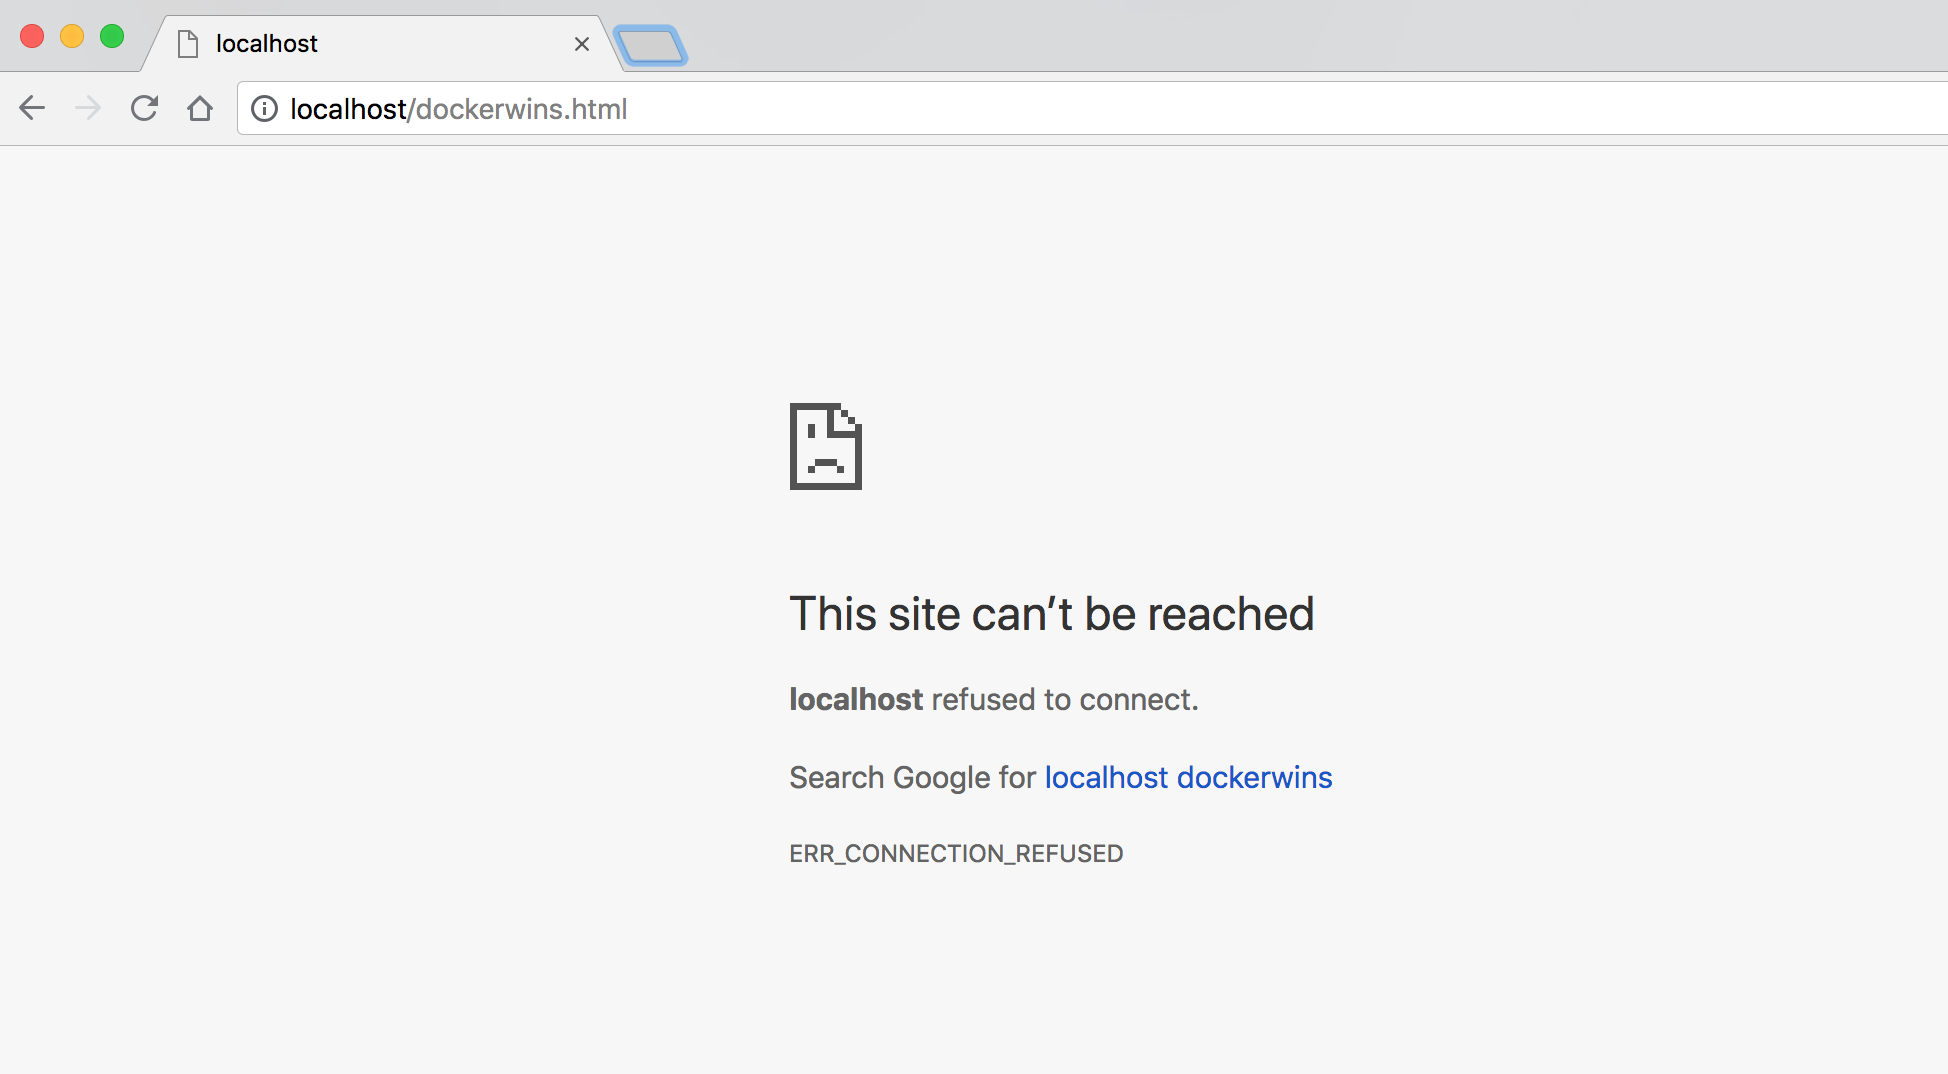
Oh, oh. What happened ? Let’s see if the container is running.
/var/tmp/mydocker$docker ps
CONTAINER ID IMAGE COMMAND CREATED STATUS PORTS NAMES
/var/tmp/mydocker$
That’s the problem. My container is not running. What happened here ?
One of the critical concepts you need learn about docker containers is, when the main process started by the container finishes, the container quits. It does not remain running.
By default /usr/sbin/nginx starts nginx in background and simply exits the command (with status code 0 upon successful start of nginx). So, even though nginx started successfully, the container quits, and hence nginx disappears (because it doesn’t have a place to run).
In order to avoid this, you can start nginx in the foreground using the command /usr/sbin/nginx -g deamon off
Let’s update our Dockerfile.
# Start nginx
CMD ["/usr/sbin/nginx", "-g", "daemon off;"]
As you can see, with CMD command, you pass in the parameters in exec form, like this:
CMD ["executable","param1","param2"]
Let’s rebuild.
/var/tmp/mydocker$docker build -t ubuntu_lab_image:1.1 .
Sending build context to Docker daemon 3.072kB
Step 1/5 : FROM ubuntu:16.04
 ---> 0b1edfbffd27
Step 2/5 : RUN apt-get update && apt-get install -y curl nginx python3.5
 ---> Using cache
 ---> fe30a31bbc60
Step 3/5 : EXPOSE 80
 ---> Using cache
 ---> 2bca4d5c0e5f
Step 4/5 : COPY dockerwins.html /var/www/html/
 ---> Using cache
 ---> 3364bf556c7f
Step 5/5 : CMD ["/usr/sbin/nginx", "-g", "daemon off;"]
 ---> Running in 17a7d54cfab8
Removing intermediate container 17a7d54cfab8
 ---> d2aa0f392116
Successfully built d2aa0f392116
Successfully tagged ubuntu_lab_image:1.1
One thing that you’ll notice right away is how fast the command finishes. This is because Docker makes use of excellent use of cache. The intermediate images that were created earlier were simply reused. This is one of the game-changing advantages of Docker. The layered images and the use of cache makes building and shipping images super fast.
Also notice how I changed the tag to version 1.1.
Let’s start the container.
/var/tmp/mydocker$docker run --name ubunut_lab -p 80:80 --rm -d ubuntu_lab_image:1.1
84bbeff9a3b150acb4f7a62cb21e8272d7ceae58ac9baa58e28f2cacec3ea4b0
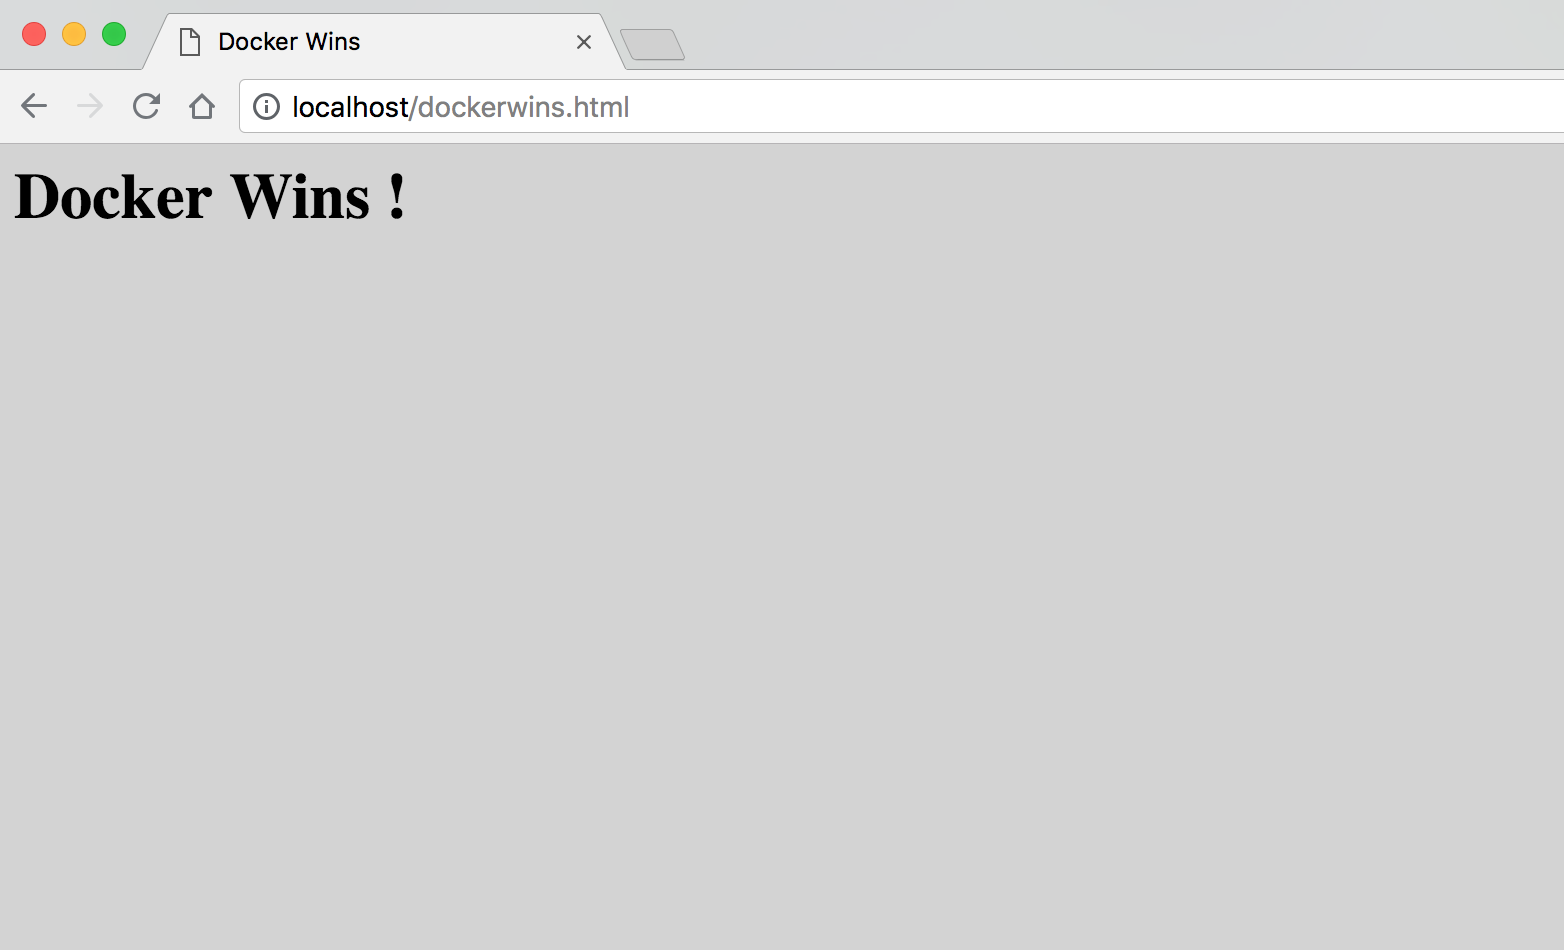
That’s it. We did it.
Great going on. You’ve built a docker image from Dockerfile and you started it.
Now, let’s move on to our final topic in this introductory guide. Docker Networking.
Docker Networking
As you know, docker container runs in a host (Physical or Virtual, Windows or Linux). And most docker containers run some flavor of Linux or Windows as the base OS. You can configure docker containers to talk to each other by configuring Docker Networking. You can also configure Docker containers to talk to other non-docker processes (For example, how would a Rails application running in a Docker container talk to a remote web service ?).
Networking in Docker is done by using specific Network Drivers. The following lists the drivers and their usage:
- Bridge: Enables multiple Standalone Docker containers running on the same Docker host to communicate. This is the default driver.
- Host: Removes the isolation between Docker host and the Docker container (other aspects such as File systems are still isolated)
- Overlay: Enables multiple Docker containers running on multiple Docker hosts to communicate. This is the driver used in Swarm services
- Macvlan: Assigns a unique MAC address for the Docker Container, making it look like a physical host. Some Legacy applications rely on communicating directly to a physical Network and Macvlan driver helps achieve that.
- Network plugins: Created by third party vendors to allow Docker Containers to communicate with specific Network stack.
You can also completely remove networking on a Docker container by using -network none when starting the container (though I doubt you’ll need such a container).
docker run -it --network none -name standalone_ubuntu ubuntu
In the resulting container, the entire network stack will be absent (i.e there won’t be any network interfaces except loopback interface)
In this guide, we’ll take a deep look at Bridge Network.
When you start the docker daemon, a Bridge Network is automatically established for you. Let’s verify this by listing the available Networks.
~$docker network ls
NETWORK ID NAME DRIVER SCOPE
528cd6fac2ab bridge bridge local
ec4ee1c485b0 host host local
db8d237a5e34 none null local
You can use the inspect command to view details of a particular Network.
~$docker network inspect bridge
[
 {
 "Name": "bridge",
 "Id": "528cd6fac2ab6ae57333d2ae13e6c3d2187a4179e479ac8b2e67dccd79b3ef96",
 "Created": "2018-06-28T23:41:05.460973438Z",
 "Scope": "local",
 "Driver": "bridge",
 "EnableIPv6": false,
 "IPAM": {
 "Driver": "default",
 "Options": null,
 "Config": [
 {
 "Subnet": "172.17.0.0/16",
 "Gateway": "172.17.0.1"
 }
 ]
 },
 "Internal": false,
 "Attachable": false,
 "Ingress": false,
 "ConfigFrom": {
 "Network": ""
 },
 "ConfigOnly": false,
 "Containers": {},
 "Options": {
 "com.docker.network.bridge.default_bridge": "true",
 "com.docker.network.bridge.enable_icc": "true",
 "com.docker.network.bridge.enable_ip_masquerade": "true",
 "com.docker.network.bridge.host_binding_ipv4": "0.0.0.0",
 "com.docker.network.bridge.name": "docker0",
 "com.docker.network.driver.mtu": "1500"
 },
 "Labels": {}
 }
]
Note that the Containers key has no values (because we have not started any containers yet).
Now, let’s start a Ubuntu container.
I’m going to quickly create a Dockerfile to include Ubuntu along with net-tools. I’ll use this image to create the container.
# Dockerfile
FROM ubuntu:18.04
RUN apt-get update && \
 apt-get install -y net-tools \
 iputils-ping
/var/tmp/mydocker/net$docker build -t ubuntu18-net-image:1.0 .
Sending build context to Docker daemon 2.048kB
Step 1/2 : FROM ubuntu:18.04
18.04: Pulling from library/ubuntu
6b98dfc16071: Pull complete
4001a1209541: Pull complete
6319fc68c576: Pull complete
b24603670dc3: Pull complete
97f170c87c6f: Pull complete
Digest: sha256:5f4bdc3467537cbbe563e80db2c3ec95d548a9145d64453b06939c4592d67b6d
Status: Downloaded newer image for ubuntu:18.04

...

...

Setting up net-tools (1.60+git20161116.90da8a0-1ubuntu1) ...
Removing intermediate container 38972828872d
 ---> f3c664a446d9
Successfully built f3c664a446d9
Successfully tagged ubuntu18-net-image:1.0
Great, let’s first start the container in daemon mode ( so that the container is run in background).
/var/tmp/mydocker/net$docker run --rm --name ubuntu18-net-1 -d -it ubuntu18-net-image:1.0
b4725f7375cc3b00810d2a4ffecf702a5667c967fe0b65f6d2107e830ca70699
Now, let’s re run the inspect command
/var/tmp/mydocker/net$docker network inspect bridge
[
 {
 "Name": "bridge",
 "Id": "528cd6fac2ab6ae57333d2ae13e6c3d2187a4179e479ac8b2e67dccd79b3ef96",
 "Created": "2018-06-28T23:41:05.460973438Z",
 "Scope": "local",
 "Driver": "bridge",
 "EnableIPv6": false,
 "IPAM": {
 "Driver": "default",
 "Options": null,
 "Config": [
 {
 "Subnet": "172.17.0.0/16",
 "Gateway": "172.17.0.1"
 }
 ]
 },
 "Internal": false,
 "Attachable": false,
 "Ingress": false,
 "ConfigFrom": {
 "Network": ""
 },
 "ConfigOnly": false,
 "Containers": {
 "b4725f7375cc3b00810d2a4ffecf702a5667c967fe0b65f6d2107e830ca70699": {
 "Name": "ubuntu18-net-1",
 "EndpointID": "d62361e287100202bf7ddd5c4b90059a5d2531b3bc120519db345d64712959c8",
 "MacAddress": "02:42:ac:11:00:02",
 "IPv4Address": "172.17.0.2/16",
 "IPv6Address": ""
 }
 },
 "Options": {
 "com.docker.network.bridge.default_bridge": "true",
 "com.docker.network.bridge.enable_icc": "true",
 "com.docker.network.bridge.enable_ip_masquerade": "true",
 "com.docker.network.bridge.host_binding_ipv4": "0.0.0.0",
 "com.docker.network.bridge.name": "docker0",
 "com.docker.network.driver.mtu": "1500"
 },
 "Labels": {}
 }
]
Notice how our container has joined this Network automatically?
You can also check this from the container itself.
/var/tmp/mydocker/net$docker run --rm --name ubuntu18-net-1 -it ubuntu18-net-image:1.0 /bin/bash

root@f6753fd456e5:/# ifconfig
eth0: flags=4163<UP,BROADCAST,RUNNING,MULTICAST> mtu 1500
 inet 172.17.0.2 netmask 255.255.0.0 broadcast 172.17.255.255
 ether 02:42:ac:11:00:02 txqueuelen 0 (Ethernet)
 RX packets 10 bytes 828 (828.0 B)
 RX errors 0 dropped 0 overruns 0 frame 0
 TX packets 0 bytes 0 (0.0 B)
 TX errors 0 dropped 0 overruns 0 carrier 0 collisions 0

lo: flags=73<UP,LOOPBACK,RUNNING> mtu 65536
 inet 127.0.0.1 netmask 255.0.0.0
 loop txqueuelen 1 (Local Loopback)
 RX packets 0 bytes 0 (0.0 B)
 RX errors 0 dropped 0 overruns 0 frame 0
 TX packets 0 bytes 0 (0.0 B)
 TX errors 0 dropped 0 overruns 0 carrier 0 collisions 0
We see that our container has a eth0 network card configured, and an IP address assigned (172.17.0.2).
root@f6753fd456e5:/# netstat -rn
Kernel IP routing table
Destination Gateway Genmask Flags MSS Window irtt Iface
0.0.0.0 172.17.0.1 0.0.0.0 UG 0 0 0 eth0
172.17.0.0 0.0.0.0 255.255.0.0 U 0 0 0 eth0
Not only our container has an IP address, it also has a default gateway configured.
Let’s start an another container.
/var/tmp/mydocker$docker run --rm --name ubuntu18-net-2 -d -it ubuntu18-net-image:1.0
a9a0e11a5fa433abb503ddd2aa505f14a89af8ae561908b5fdf75832d73ff73b
/var/tmp/mydocker$docker ps
CONTAINER ID IMAGE COMMAND CREATED STATUS PORTS NAMES
a9a0e11a5fa4 ubuntu18-net-image:1.0 "/bin/bash" 5 seconds ago Up 7 seconds ubuntu18-net-2
b4725f7375cc ubuntu18-net-image:1.0 "/bin/bash" 42 minutes ago Up 42 minutes ubuntu18-net-1
/var/tmp/mydocker$docker network inspect bridge

...

 "Containers": {
 "a9a0e11a5fa433abb503ddd2aa505f14a89af8ae561908b5fdf75832d73ff73b": {
 "Name": "ubuntu18-net-2",
 "EndpointID": "57400b64c061336c4301c75c276350b972154a624548f048838487f014c69f75",
 "MacAddress": "02:42:ac:11:00:03",
 "IPv4Address": "172.17.0.3/16",
 "IPv6Address": ""
 },
 "b4725f7375cc3b00810d2a4ffecf702a5667c967fe0b65f6d2107e830ca70699": {
 "Name": "ubuntu18-net-1",
 "EndpointID": "f5370e0952358d3a94aa4d3749fb6f7819588b427cafe020c8039eaa2150a555",
 "MacAddress": "02:42:ac:11:00:02",
 "IPv4Address": "172.17.0.2/16",
 "IPv6Address": ""
 }

...
Let’s login to one of the containers and try to ping the other container.
/var/tmp/mydocker$docker exec -it ubuntu18-net-2 /bin/bash
root@a9a0e11a5fa4:/# ifconfig eth0
eth0: flags=4163<UP,BROADCAST,RUNNING,MULTICAST> mtu 1500
 inet 172.17.0.3 netmask 255.255.0.0 broadcast 172.17.255.255
 ether 02:42:ac:11:00:03 txqueuelen 0 (Ethernet)
 RX packets 138 bytes 150324 (150.3 KB)
 RX errors 0 dropped 0 overruns 0 frame 0
 TX packets 89 bytes 5664 (5.6 KB)
 TX errors 0 dropped 0 overruns 0 carrier 0 collisions 0

root@a9a0e11a5fa4:/# ping 172.17.0.2
PING 172.17.0.2 (172.17.0.2) 56(84) bytes of data.
64 bytes from 172.17.0.2: icmp_seq=1 ttl=64 time=0.156 ms
64 bytes from 172.17.0.2: icmp_seq=2 ttl=64 time=0.114 ms
64 bytes from 172.17.0.2: icmp_seq=3 ttl=64 time=0.119 ms
^C
Great, our containers can talk to each other 🙂
Note that I used IP address to test the connectivity. Can I use the container name? With the default bridge network it is not possible to do that. In practice you will be creating a user-defined bridge network and have the containers join this network (using –net option of docker run command). With user-defined Bridge network, it is possible to use container names instead of IP addresses.
There are many advantages of creating a user-defined Bridge network. One of them is the automatic service discovery which makes it possible to use hostnames instead of IP addresses.
Let’s create a user-defined Bridge Network named ubuntu-bridge.
var/tmp/mydocker$docker network create --driver bridge ubuntu-bridge
d664e5efe6a892991321d50a0d142dce842d25b81af377f109b290b37e1b5d87
/var/tmp/mydocker$docker network inspect ubuntu-bridge
[
 {
 "Name": "ubuntu-bridge",
 "Id": "d664e5efe6a892991321d50a0d142dce842d25b81af377f109b290b37e1b5d87",
 "Created": "2018-07-08T17:19:18.698164251Z",
 "Scope": "local",
 "Driver": "bridge",
 "EnableIPv6": false,
 "IPAM": {
 "Driver": "default",
 "Options": {},
 "Config": [
 {
 "Subnet": "172.18.0.0/16",
 "Gateway": "172.18.0.1"
 }
 ]
 },
 "Internal": false,
 "Attachable": false,
 "Ingress": false,
 "ConfigFrom": {
 "Network": ""
 },
 "ConfigOnly": false,
 "Containers": {},
 "Options": {},
 "Labels": {}
 }
]
Notice the subnet 172.18. (The default Bridge network had 172.17).
You can also verify that the ubuntu-bridge network shows up in the list of available networks.
/var/tmp/mydocker$docker network ls
NETWORK ID NAME DRIVER SCOPE
528cd6fac2ab bridge bridge local
ec4ee1c485b0 host host local
db8d237a5e34 none null local
d664e5efe6a8 ubuntu-bridge bridge local
Let’s start two more containers and connect them to his user-defined ubuntu-bridge network. You use the –net flag with docker run command to connect the container to a network.
/var/tmp/mydocker$docker run --rm -d -it --net ubuntu-bridge --name ubuntu18-net-3 ubuntu18-net-image:1.0
d327989cfba85d07febb986d6a1c0aadd11eb17b2d243f0d317b9d814e99936c
/var/tmp/mydocker$docker run --rm -d -it --net ubuntu-bridge --name ubuntu18-net-4 ubuntu18-net-image:1.0
41aa8700c843e04e9371bc6578c6ca31f04fe13492d6e78e02fcb1378f750ea2
/var/tmp/mydocker$docker network inspect ubuntu-bridge

...

Containers": {
 "41aa8700c843e04e9371bc6578c6ca31f04fe13492d6e78e02fcb1378f750ea2": {
 "Name": "ubuntu18-net-4",
 "EndpointID": "faa3cde3c1933fd0854d57196a449e48c73a2605d1bf9ee86d4e5ffab9dc5ff0",
 "MacAddress": "02:42:ac:12:00:03",
 "IPv4Address": "172.18.0.3/16",
 "IPv6Address": ""
 },
 "d327989cfba85d07febb986d6a1c0aadd11eb17b2d243f0d317b9d814e99936c": {
 "Name": "ubuntu18-net-3",
 "EndpointID": "ce27a339710f974ad1569ceb31e89ed2ad0dd40a48442a83af8b22892d2d1c03",
 "MacAddress": "02:42:ac:12:00:02",
 "IPv4Address": "172.18.0.2/16",
 "IPv6Address": ""
 }
 },

...
Let’s login to one of the containers and ping the other using container name.
/var/tmp/mydocker$docker exec -it ubuntu18-net-3 /bin/bash
root@d327989cfba8:/# ping ubuntu18-net-4
PING ubuntu18-net-4 (172.18.0.3) 56(84) bytes of data.
64 bytes from ubuntu18-net-4.ubuntu-bridge (172.18.0.3): icmp_seq=1 ttl=64 time=0.149 ms
64 bytes from ubuntu18-net-4.ubuntu-bridge (172.18.0.3): icmp_seq=2 ttl=64 time=0.118 ms
64 bytes from ubuntu18-net-4.ubuntu-bridge (172.18.0.3): icmp_seq=3 ttl=64 time=0.112 ms
64 bytes from ubuntu18-net-4.ubuntu-bridge (172.18.0.3): icmp_seq=4 ttl=64 time=0.119 ms
^C
That’s it. You have configured Docker Networking, at least a basic one. Like mentioned before Bridge networks are used for Standalone containers that need to talk to each other. You would be using overlay networks when you deal with Swarm clusters. We will cover them using an another guide.
good article on docker
Outstanding article! I really appreciates the clarity in this article.
Very, very good article!
Superb!
Keep on the good work. 🙂
Amazing work, it made things look so simple and easy.
Very Good Article. Please make a video on this article…
Great article.. thanks
Great article! Very clear explanations. Another article on how to actually develop with docker containers would be super helpful. Maybe laying out a practical development workflow in a docker environment. Thanks!
Hello Karun,
I found it very interesting, and things are made to be simple through step by step process.
I have a specific requirement with docker.
on my Windows 10 PC desktop.
–I installed docker on my PC (version:- docker desktop 2.2.0.0)
–Want ubuntu 16.04.6 Server Edition to be installed, what I am seeing is ubuntu 16.4 desktop version gets downloaded and not Server Edition of 16.04.6
–Even I tried downloading ubuntu-16.04.6-server-amd64, on desktop and tried to run it, but still its not detecting locally.
I could able to run ubuntu 16.04 desktop without any issue, as I am looking for server Edition, what additional I need to do to get it worked on my desktop.
Regards,
Jaykumar